测试读写分离
准备
说明
准备三台mysql(8.0) 主从复制 服务器
一台为master,两台为slave
建表
CREATE DATABASE db_user;
USE db_user;
CREATE TABLE t_user (
 id BIGINT AUTO_INCREMENT,
 uname VARCHAR(30),
 PRIMARY KEY (id)
);
INSERT INTO t_user(uname) VALUES('zhang3');
INSERT INTO t_user(uname) VALUES(@@hostname);
搭建springboot
pom
<project xmlns="http://maven.apache.org/POM/4.0.0" xmlns:xsi="http://www.w3.org/2001/XMLSchema-instance"
    xsi:schemaLocation="http://maven.apache.org/POM/4.0.0 http://maven.apache.org/xsd/maven-4.0.0.xsd">
    <modelVersion>4.0.0</modelVersion>
    <groupId>com.pj</groupId>
    <artifactId>springboot-pure</artifactId>
    <version>0.0.1-SNAPSHOT</version>

    <!-- SpringBoot -->
    <parent>
        <groupId>org.springframework.boot</groupId>
        <artifactId>spring-boot-starter-parent</artifactId>
        <version>2.3.3.RELEASE</version>
    </parent>

    <!-- 指定一些属性 -->
    <properties>
        <java.version>1.8</java.version>
        <maven-jar-plugin.version>3.1.1</maven-jar-plugin.version>
    </properties>

    <dependencies>
        <dependency>
            <groupId>org.springframework.boot</groupId>
            <artifactId>spring-boot-starter-web</artifactId>
        </dependency>

        <dependency>
            <groupId>org.apache.shardingsphere</groupId>
            <artifactId>shardingsphere-jdbc-core-spring-boot-starter</artifactId>
            <version>5.1.1</version>
        </dependency>

        <dependency>
            <groupId>mysql</groupId>
            <artifactId>mysql-connector-java</artifactId>
            <scope>runtime</scope>
        </dependency>

        <dependency>
            <groupId>com.baomidou</groupId>
            <artifactId>mybatis-plus-boot-starter</artifactId>
            <version>3.3.1</version>
        </dependency>

        <dependency>
            <groupId>org.projectlombok</groupId>
            <artifactId>lombok</artifactId>
            <optional>true</optional>
        </dependency>

        <dependency>
            <groupId>org.springframework.boot</groupId>
            <artifactId>spring-boot-starter-test</artifactId>
            <scope>test</scope>
            <exclusions>
                <exclusion>
                    <groupId>org.junit.vintage</groupId>
                    <artifactId>junit-vintage-engine</artifactId>
                </exclusion>
            </exclusions>
        </dependency>
    </dependencies>
</project>
application.yml
spring:
  application:
    name: sharging-jdbc-demo
  profiles:
    active: dev
  shardingsphere:
    datasource:
      # 主数据源
      master:
        driver-class-name: com.mysql.cjjdbc.Driver
        jdbc-url: jdbc:mysql://192.168.43.89:3306/db_user
        password: 123456
        type: com.zaxxer.hikari.HikariDataSource
        username: root
      names: master,slave1,slave2
      # 从数据源
      slave1:
        driver-class-name: com.mysql.jdbc.Driver
        jdbc-url: jdbc:mysql://192.168.43.227:3306/db_user
        password: 123456
        type: com.zaxxer.hikari.HikariDataSource
        username: root
      # 从数据源
      slave2:
        driver-class-name: com.mysql.jdbc.Driver
        jdbc-url: jdbc:mysql://192.168.43.251:3306/db_user
        password: 123456
        type: com.zaxxer.hikari.HikariDataSource
        username: root
    mode:
      type: Standalone # 单机模式
      repository:
        type: File
      overwrite: true
    props:
      sql-show: true # 打印sql
    # 规则
    rules:
      readwrite-splitting:
        data-sources:
          myds:
            load-balancer-name: alg_round
            props:
              read-data-source-names: slave1,slave2 # 读数据库
              write-data-source-name: master # 写数据库
            type: Static
        load-balancers:
          alg_random:
            type: RANDOM
          alg_round:
            type: ROUND_ROBIN
          alg_weight:
            props:
              slave1: 1
              slave2: 2
            type: WEIGHT
- application.properties
# 应用名称
spring.application.name=sharging-jdbc-demo
# 开发环境设置
spring.profiles.active=dev
# 内存模式
spring.shardingsphere.mode.type=Memory

# 配置真实数据源
spring.shardingsphere.datasource.names=master,slave1,slave2

# 配置第 1 个数据源
spring.shardingsphere.datasource.master.type=com.zaxxer.hikari.HikariDataSource
spring.shardingsphere.datasource.master.driver-class-name=com.mysql.jdbc.Driver
spring.shardingsphere.datasource.master.jdbc-url=jdbc:mysql://192.168.100.201:3306/db_user
spring.shardingsphere.datasource.master.username=root
spring.shardingsphere.datasource.master.password=123456

# 配置第 2 个数据源
spring.shardingsphere.datasource.slave1.type=com.zaxxer.hikari.HikariDataSource
spring.shardingsphere.datasource.slave1.driver-class-name=com.mysql.jdbc.Driver
spring.shardingsphere.datasource.slave1.jdbc-url=jdbc:mysql://192.168.100.201:3307/db_user
spring.shardingsphere.datasource.slave1.username=root
spring.shardingsphere.datasource.slave1.password=123456

# 配置第 3 个数据源
spring.shardingsphere.datasource.slave2.type=com.zaxxer.hikari.HikariDataSource
spring.shardingsphere.datasource.slave2.driver-class-name=com.mysql.jdbc.Driver
spring.shardingsphere.datasource.slave2.jdbc-url=jdbc:mysql://192.168.100.201:3308/db_user
spring.shardingsphere.datasource.slave2.username=root
spring.shardingsphere.datasource.slave2.password=123456

# 读写分离类型,如: Static,Dynamic
spring.shardingsphere.rules.readwrite-splitting.data-sources.myds.type=Static
# 写数据源名称
spring.shardingsphere.rules.readwrite-splitting.data-sources.myds.props.write-data-source-name=master
# 读数据源名称,多个从数据源用逗号分隔
spring.shardingsphere.rules.readwrite-splitting.data-sources.myds.props.read-data-source-names=slave1,slave2

# 负载均衡算法名称
spring.shardingsphere.rules.readwrite-splitting.data-sources.myds.load-balancer-name=alg_round

# 负载均衡算法配置
# 负载均衡算法类型
spring.shardingsphere.rules.readwrite-splitting.load-balancers.alg_round.type=ROUND_ROBIN
spring.shardingsphere.rules.readwrite-splitting.load-balancers.alg_random.type=RANDOM
spring.shardingsphere.rules.readwrite-splitting.load-balancers.alg_weight.type=WEIGHT
spring.shardingsphere.rules.readwrite-splitting.load-balancers.alg_weight.props.slave1=1
spring.shardingsphere.rules.readwrite-splitting.load-balancers.alg_weight.props.slave2=2

# 打印SQl
spring.shardingsphere.props.sql-show=true
实体类
import com.baomidou.mybatisplus.annotation.IdType;
import com.baomidou.mybatisplus.annotation.TableId;
import com.baomidou.mybatisplus.annotation.TableName;
import lombok.Data;
import lombok.ToString;

@TableName("t_user")
@Data
@ToString
public class User {
    @TableId(type = IdType.ASSIGN_ID)
    private Long id;
    private String uname;
}
mapper 类
import com.baomidou.mybatisplus.core.mapper.BaseMapper;
import com.pj.entity.User;
import org.apache.ibatis.annotations.Mapper;

@Mapper
public interface UserMapper extends BaseMapper<User> {
}
controller类
import com.pj.entity.User;
import com.pj.mapper.UserMapper;
import org.springframework.beans.factory.annotation.Autowired;
import org.springframework.web.bind.annotation.GetMapping;
import org.springframework.web.bind.annotation.RequestMapping;
import org.springframework.web.bind.annotation.RestController;

@RestController
@RequestMapping("/test")
public class TestController {


    @Autowired
    private UserMapper userMapper;
    @GetMapping("testInsert")
    public void testInsert(){
        User user = new User();
        user.setUname("张三丰");
        userMapper.insert(user);
    }


    @GetMapping("testQuery")
    public void testQuery(){
        User user = userMapper.selectById(1649258099341262850L);
        System.out.println(user);
    }
}
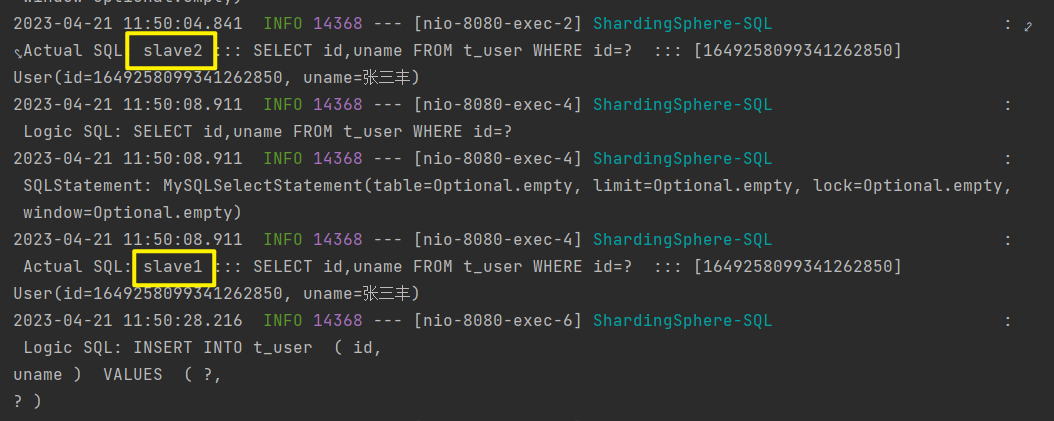
测试
- 写
http://localhost:8080/test/testInsert
打印sql

- 读
http://localhost:8080/test/testQuery
打印sql
测试垂直分片
准备
说明
两个mysql数据库,
其中一个库存用户信息,一个库存订单信息
建表
-- 主表
CREATE DATABASE db_test;
USE db_test;
CREATE TABLE t_test (
 id BIGINT AUTO_INCREMENT,
 PRIMARY KEY (id)
);

-- user
CREATE DATABASE db_user;
USE db_user;
CREATE TABLE t_user (
 id BIGINT AUTO_INCREMENT,
 uname VARCHAR(30),
 PRIMARY KEY (id)
);

-- order
CREATE DATABASE db_order;
USE db_order;
CREATE TABLE t_order (
  id BIGINT AUTO_INCREMENT,
  order_no VARCHAR(30),
  user_id BIGINT,
  amount DECIMAL(10,2),
  PRIMARY KEY(id)
);


DROP TABLE IF EXISTS `t_order_item`;
CREATE TABLE `t_order_item`  (
  `id` int NOT NULL,
  `order_id` int NULL DEFAULT NULL,
  `name` varchar(255) CHARACTER SET utf8mb4 COLLATE utf8mb4_0900_ai_ci NULL DEFAULT NULL,
  PRIMARY KEY (`id`) USING BTREE
) ENGINE = InnoDB CHARACTER SET = utf8mb4 COLLATE = utf8mb4_0900_ai_ci ROW_FORMAT = Dynamic;
搭建
pom
<!-- 同上 -->
application.yml
spring:
  application:
    name: sharding-jdbc-demo
  profiles:
    active: dev
  shardingsphere:
    datasource:
      # 数据源名称,第一个默认为主库,当某表未在规则(rules)中进行配置时,系统会默认在主库中寻找。
      names: server-test,server-user,server-order
      server-test: # 订单数据源
        driver-class-name: com.mysql.jdbc.Driver
        jdbc-url: jdbc:mysql://192.168.43.89:3306/db_test
        password: 123456
        type: com.zaxxer.hikari.HikariDataSource
        username: root
      server-order: # 订单数据源
        driver-class-name: com.mysql.jdbc.Driver
        jdbc-url: jdbc:mysql://192.168.43.89:3306/db_order
        password: 123456
        type: com.zaxxer.hikari.HikariDataSource
        username: root
      server-user: # 用户数据源
        driver-class-name: com.mysql.jdbc.Driver
        jdbc-url: jdbc:mysql://192.168.43.89:3306/db_user
        password: 123456
        type: com.zaxxer.hikari.HikariDataSource
        username: root
    props:
      sql-show: true # 打印sql
    # 规则
    rules:
      sharding:
        tables:
          t_order:
            actual-data-nodes: server-order.t_order
          t_order_item:
            actual-data-nodes: server-order.t_order_item
          t_user:
            actual-data-nodes: server-user.t_user
方式二
# 应用名称
spring.application.name=sharding-jdbc-demo
# 环境设置
spring.profiles.active=dev

# 配置真实数据源
spring.shardingsphere.datasource.names=server-user,server-order

# 配置第 1 个数据源
spring.shardingsphere.datasource.server-user.type=com.zaxxer.hikari.HikariDataSource
spring.shardingsphere.datasource.server-user.driver-class-name=com.mysql.jdbc.Driver
spring.shardingsphere.datasource.server-user.jdbc-url=jdbc:mysql://192.168.100.201:3301/db_user
spring.shardingsphere.datasource.server-user.username=root
spring.shardingsphere.datasource.server-user.password=123456

# 配置第 2 个数据源
spring.shardingsphere.datasource.server-order.type=com.zaxxer.hikari.HikariDataSource
spring.shardingsphere.datasource.server-order.driver-class-name=com.mysql.jdbc.Driver
spring.shardingsphere.datasource.server-order.jdbc-url=jdbc:mysql://192.168.100.201:3302/db_order
spring.shardingsphere.datasource.server-order.username=root
spring.shardingsphere.datasource.server-order.password=123456

# 标准分片表配置(数据节点)
# spring.shardingsphere.rules.sharding.tables.<table-name>.actual-data-nodes=值
# 值由数据源名 + 表名组成,以小数点分隔。
# <table-name>:逻辑表名
spring.shardingsphere.rules.sharding.tables.t_user.actual-data-nodes=server-user.t_user
spring.shardingsphere.rules.sharding.tables.t_order.actual-data-nodes=server-order.t_order


# 打印SQL
spring.shardingsphere.props.sql-show=true
实体类
import com.baomidou.mybatisplus.annotation.IdType;
import com.baomidou.mybatisplus.annotation.TableId;
import com.baomidou.mybatisplus.annotation.TableName;
import lombok.Data;

@TableName("t_order_item")
@Data
public class OrderItem {

    @TableId(type = IdType.ASSIGN_ID)
    private Long id;

    private Long OrderId;

    private String name;

}
import com.baomidou.mybatisplus.annotation.IdType;
import com.baomidou.mybatisplus.annotation.TableId;
import com.baomidou.mybatisplus.annotation.TableName;
import lombok.Data;

import java.math.BigDecimal;

@TableName("t_order")
@Data
public class Order {
    @TableId(type = IdType.ASSIGN_ID)
    private Long id;
    private String orderNo;
    private Long userId;
    private BigDecimal amount;
}
package com.pj.entity;

import com.baomidou.mybatisplus.annotation.IdType;
import com.baomidou.mybatisplus.annotation.TableId;
import com.baomidou.mybatisplus.annotation.TableName;
import lombok.Data;

@TableName("t_test")
@Data
public class Test {

    @TableId(type = IdType.ASSIGN_ID)
    private Long id;

}
创建mapper类
package com.pj.mapper;

import com.baomidou.mybatisplus.core.mapper.BaseMapper;
import com.pj.entity.User;
import org.apache.ibatis.annotations.Mapper;
import org.apache.ibatis.annotations.Param;
import org.apache.ibatis.annotations.Select;

@Mapper
public interface UserMapper extends BaseMapper<User> {

    // 测试垂直分片
    @Select("select * from t_user where id = (select max(user_id) from t_order where id = #{ id, jdbcType=VARCHAR}")
    User getUserByOrderId(@Param("id") Long id);

}
import com.baomidou.mybatisplus.core.mapper.BaseMapper;
import com.pj.entity.Order;
import org.apache.ibatis.annotations.Mapper;

@Mapper
public interface OrderMapper extends BaseMapper<Order> {
}
import com.baomidou.mybatisplus.core.mapper.BaseMapper;
import com.pj.entity.Order;
import org.apache.ibatis.annotations.Mapper;

@Mapper
public interface OrderMapper extends BaseMapper<Order> {
}
import com.baomidou.mybatisplus.core.mapper.BaseMapper;
import com.pj.entity.Test;
import org.apache.ibatis.annotations.Mapper;

@Mapper
public interface TestMapper extends BaseMapper<Test> {
}
controller类
import com.pj.entity.Order;
import com.pj.entity.OrderItem;
import com.pj.entity.Test;
import com.pj.entity.User;
import com.pj.mapper.OrderItemMapper;
import com.pj.mapper.OrderMapper;
import com.pj.mapper.TestMapper;
import com.pj.mapper.UserMapper;
import org.springframework.beans.factory.annotation.Autowired;
import org.springframework.web.bind.annotation.GetMapping;
import org.springframework.web.bind.annotation.RequestMapping;
import org.springframework.web.bind.annotation.RestController;

import java.math.BigDecimal;

@RestController
@RequestMapping("vertical")
public class VerticalController {

    @Autowired
    private UserMapper userMapper;

    @Autowired
    private OrderMapper orderMapper;

    @Autowired
    private OrderItemMapper orderItemMapper;

    @Autowired
    private TestMapper testMapper;


    /**
     * 测试新增
     */
    @GetMapping("/testInster")
    public void testInster(){
        User user = new User();
        user.setUname("强哥");
        userMapper.insert(user);

        Order order = new Order();
        order.setOrderNo("ATGUIGU001");
        order.setUserId(user.getId());
        order.setAmount(new BigDecimal(100));
        orderMapper.insert(order);

        OrderItem orderItem = new OrderItem();
        orderItem.setOrderId(order.getId());
        orderItem.setName("testName");
        orderItemMapper.insert(orderItem);
    }

    /**
     * 测试查询
     */
    @GetMapping("/testQuery")
    public void testQuery(){
        User user = userMapper.selectById(1L);
        Order order = orderMapper.selectById(1L);
        OrderItem orderItem = orderItemMapper.selectById(1L);
    }

    /**
     * 测试没有配置分片的表
     */
    @GetMapping("/testNoV")
    public void testNoV(){
        Test test = new Test();
        testMapper.insert(test);
    }

    /**
     * 测试关联查询
     */
    @GetMapping("/glQuery")
    public void glQuery(){
        User user = userMapper.getUserByOrderId(1649310682529521666L);
        System.out.println(user.getUname());
    }

}
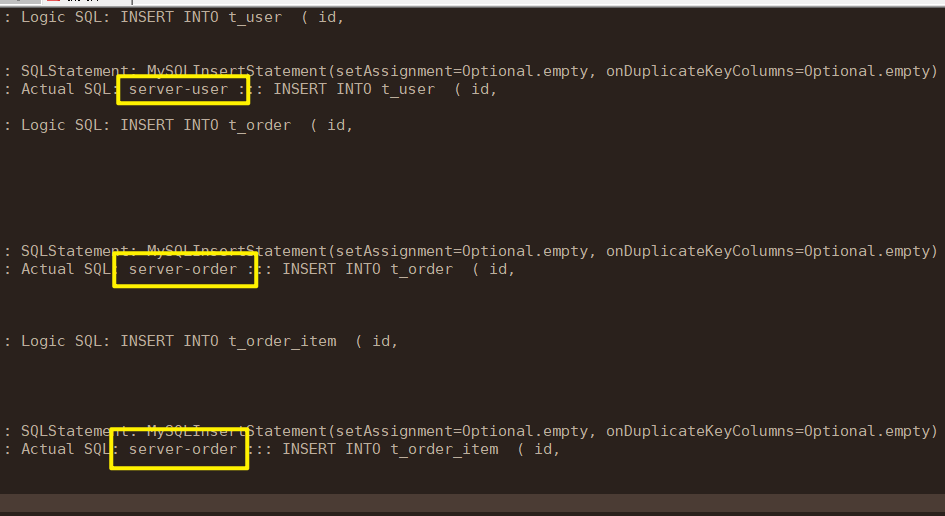
测试
- 写
GET http://localhost:8080/vertical/testInster
- 查
http://localhost:8080/vertical/testQuery

- 测试没有进行配置规则的表
http://localhost:8080/vertical/testNoV

- 测试分片后关联查询(报错)
http://localhost:8080/vertical/glQuery
问题
问题一
当垂直分库后,不同库的表,如果有关联关系,无法进行关联查询。应当怎样配置才能进行关联查询?
测试水平分片
说明
水平分表、水平分库的区别
我理解的是,水平分表,可能是在同一个数据库中,把一个表,分成两个表。
水平分库,是在不通的库中,将一个表,分成多个表。
准备
创建三个数据库
- 数据库一
CREATE DATABASE db_order;
USE db_order;
CREATE TABLE t_order0 (
  id BIGINT,
  order_no VARCHAR(30),
  user_id BIGINT,
  amount DECIMAL(10,2),
  PRIMARY KEY(id)
);
CREATE TABLE t_order1 (
  id BIGINT,
  order_no VARCHAR(30),
  user_id BIGINT,
  amount DECIMAL(10,2),
  PRIMARY KEY(id)
);
数据库二
CREATE DATABASE db_order;
USE db_order;
CREATE TABLE t_order0 (
  id BIGINT,
  order_no VARCHAR(30),
  user_id BIGINT,
  amount DECIMAL(10,2),
  PRIMARY KEY(id)
);
CREATE TABLE t_order1 (
  id BIGINT,
  order_no VARCHAR(30),
  user_id BIGINT,
  amount DECIMAL(10,2),
  PRIMARY KEY(id)
);
数据库三
CREATE DATABASE db_user;
USE db_user;
CREATE TABLE t_user (
 id BIGINT AUTO_INCREMENT,
 uname VARCHAR(30),
 PRIMARY KEY (id)
);
水平分库
搭建
application.yml
spring:
  application:
    name: sharging-jdbc-demo
  profiles:
    active: dev
  shardingsphere:
    datasource:
      ## 三个数据库名称
      names: server-user,server-order0,server-order1
      server-order0:
        driver-class-name: com.mysql.jdbc.Driver
        jdbc-url: jdbc:mysql://192.168.43.89:3306/db_order
        password: 123456
        type: com.zaxxer.hikari.HikariDataSource
        username: root
      server-order1:
        driver-class-name: com.mysql.jdbc.Driver
        jdbc-url: jdbc:mysql://192.168.43.222:3306/db_order
        password: 123456
        type: com.zaxxer.hikari.HikariDataSource
        username: root
      server-user:
        driver-class-name: com.mysql.jdbc.Driver
        jdbc-url: jdbc:mysql://192.168.43.89:3306/db_user
        password: 123456
        type: com.zaxxer.hikari.HikariDataSource
        username: root
    props:
      sql-show: true
    rules:
      sharding:
        sharding-algorithms:  ## 分片策略
          alg_mod: ## 策略名称
            props: ## 策略参数
              sharding-count: 2
            type: MOD # 策略类型
          alg_inline_userid: ## 第二个策略名称
            props: ## 参数
              algorithm-expression: server-order$->{user_id % 2} # 自定义计算规则
            type: INLINE  # 类型
        tables: ## 表
          t_order:  ## 逻辑表
            actual-data-nodes: server-order0.t_order0, server-order1.t_order0 # 不同库中的真实表
            database-strategy: # 设置分片规则
              standard:
                sharding-algorithm-name: alg_mod # 选的规则名称
                sharding-column: user_id  # 参与分片的字段
          t_user:
            actual-data-nodes: server-user.t_user
实体类
package com.pj.entity;

import com.baomidou.mybatisplus.annotation.IdType;
import com.baomidou.mybatisplus.annotation.TableId;
import com.baomidou.mybatisplus.annotation.TableName;
import lombok.Data;

import java.math.BigDecimal;


@TableName("t_order")
@Data
public class Order {
    @TableId(type = IdType.ASSIGN_ID)
    private Long id;
    private String orderNo;
    private Long userId;
    private BigDecimal amount;
}
package com.pj.entity;

import com.baomidou.mybatisplus.annotation.IdType;
import com.baomidou.mybatisplus.annotation.TableId;
import com.baomidou.mybatisplus.annotation.TableName;
import lombok.Data;
import lombok.ToString;

@TableName("t_user")
@Data
@ToString
public class User {
    @TableId(type = IdType.ASSIGN_ID)
    private Long id;
    private String uname;
}
mapper
import com.baomidou.mybatisplus.core.mapper.BaseMapper;
import com.pj.entity.Order;
import org.apache.ibatis.annotations.Mapper;

@Mapper
public interface OrderMapper extends BaseMapper<Order> {
}
import com.baomidou.mybatisplus.core.mapper.BaseMapper;
import com.pj.entity.User;
import org.apache.ibatis.annotations.Mapper;
import org.apache.ibatis.annotations.Param;
import org.apache.ibatis.annotations.Select;

@Mapper
public interface UserMapper extends BaseMapper<User> {
}
controller
import com.baomidou.mybatisplus.core.conditions.query.QueryWrapper;
import com.pj.entity.Order;
import com.pj.entity.User;
import com.pj.mapper.OrderMapper;
import com.pj.mapper.UserMapper;
import org.apache.ibatis.annotations.Select;
import org.apache.ibatis.lang.UsesJava7;
import org.springframework.beans.factory.annotation.Autowired;
import org.springframework.web.bind.annotation.GetMapping;
import org.springframework.web.bind.annotation.RequestMapping;
import org.springframework.web.bind.annotation.RestController;
import java.util.Date;
import java.util.List;
@RestController
@RequestMapping("/level")
public class LevelController {
@Autowired
OrderMapper orderMapper;
@Autowired
UserMapper userMapper;
//测试新增
@GetMapping("/testInster")
public void testInster(){
int i = 10;
while (i>0){
Order order = new Order();
// userId 字段必须赋值,因为配置文件中用这个字段 分表,如果不赋值,则会报错
order.setUserId(new Date().getTime());
orderMapper.insert(order);
i--;
}
}
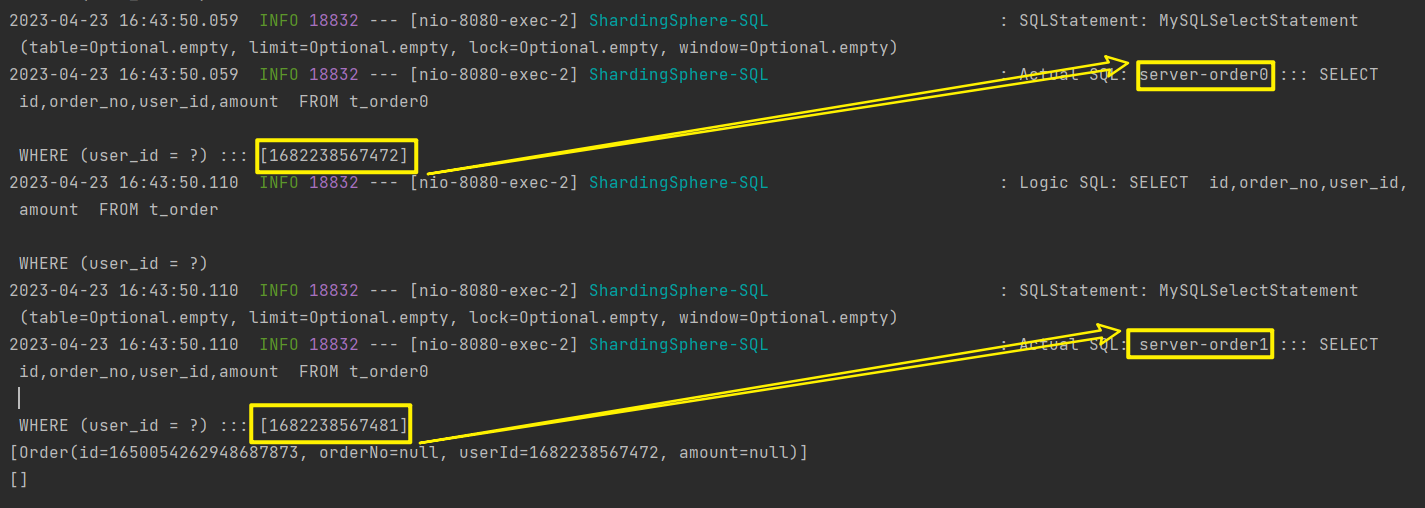
// 测试查询
@GetMapping("/testQuery")
public void testQuery(){
List<Order> user = orderMapper.selectList(new QueryWrapper<Order>().eq("user_id", 1682238567472L));
List<Order> user2 = orderMapper.selectList(new QueryWrapper<Order>().eq("user_id", 1682238567481L));
System.out.println(user);
System.out.println(user2);
}
}
测试
测试新增
http://localhost:8080/level/testInster
测试查询
http://localhost:8080/level/testQuery
水平分表
搭建
说明:
只有配置文件不一样,将:database-strategy改为:table-strategy
application.yml
spring:
  application:
    name: sharging-jdbc-demo
  profiles:
    active: dev
  shardingsphere:
    datasource:
      ## 三个数据库名称
      names: server-user,server-order0,server-order1
      server-order0:
        driver-class-name: com.mysql.jdbc.Driver
        jdbc-url: jdbc:mysql://192.168.43.89:3306/db_order
        password: 123456
        type: com.zaxxer.hikari.HikariDataSource
        username: root
      server-order1:
        driver-class-name: com.mysql.jdbc.Driver
        jdbc-url: jdbc:mysql://192.168.43.222:3306/db_order
        password: 123456
        type: com.zaxxer.hikari.HikariDataSource
        username: root
      server-user:
        driver-class-name: com.mysql.jdbc.Driver
        jdbc-url: jdbc:mysql://192.168.43.89:3306/db_user
        password: 123456
        type: com.zaxxer.hikari.HikariDataSource
        username: root
    props:
      sql-show: true
    mode:
      type: Memory
    rules:
      sharding:
        sharding-algorithms:  ## 分片策略
          alg_mod: ## 策略名称
            props: ## 策略参数
              sharding-count: 2
            type: MOD # 策略类型
          alg_inline_userid: ## 第二个策略名称
            props: ## 参数
              algorithm-expression: server-order$->{user_id % 2} # 自定义计算规则
            type: INLINE  # 类型
          alg_hash_mod:
            props:
              sharding-count: 2
            type: HASH_MOD
        tables: ## 表
          t_order:  ## 逻辑表
            actual-data-nodes: server-order0.t_order0, server-order0.t_order1 # 真实表
            table-strategy: # 设置分表规则
              standard:
                sharding-algorithm-name: alg_mod
                sharding-column: user_id
          t_user:
            actual-data-nodes: server-user.t_user
水平分库分表
说明
同时保留 database-strategy 和 table-strategy
搭建
application,yml
spring:
  application:
    name: sharging-jdbc-demo
  profiles:
    active: dev
  shardingsphere:
    datasource:
      ## 三个数据库名称
      names: server-user,server-order0,server-order1
      server-order0:
        driver-class-name: com.mysql.jdbc.Driver
        jdbc-url: jdbc:mysql://192.168.43.89:3306/db_order
        password: 123456
        type: com.zaxxer.hikari.HikariDataSource
        username: root
      server-order1:
        driver-class-name: com.mysql.jdbc.Driver
        jdbc-url: jdbc:mysql://192.168.43.222:3306/db_order
        password: 123456
        type: com.zaxxer.hikari.HikariDataSource
        username: root
      server-user:
        driver-class-name: com.mysql.jdbc.Driver
        jdbc-url: jdbc:mysql://192.168.43.89:3306/db_user
        password: 123456
        type: com.zaxxer.hikari.HikariDataSource
        username: root
    props:
      sql-show: true
    mode:
      type: Memory
    rules:
      sharding:
        sharding-algorithms:  ## 分片策略
          alg_mod: ## 策略名称
            props: ## 策略参数
              sharding-count: 2
            type: MOD # 策略类型
          alg_inline_userid: ## 第二个策略名称
            props: ## 参数
              algorithm-expression: server-order$->{user_id % 2} # 自定义计算规则
            type: INLINE  # 类型
          alg_hash_mod:
            props:
              sharding-count: 2
            type: HASH_MOD
        tables: ## 表
          t_order:  ## 逻辑表
            actual-data-nodes: server-order0.t_order0, server-order1.t_order0,server-order0.t_order1, server-order1.t_order1 # 不同库中的真实表
            table-strategy: # 设置分表规则
              standard:
                sharding-algorithm-name: alg_hash_mod
                sharding-column: order_no
            database-strategy: # 设置分库规则
              standard:
                sharding-algorithm-name: alg_mod
                sharding-column: user_id
          t_user:
            actual-data-nodes: server-user.t_user
雪花算法说明
基于mybatis-plus
修改实体类主键注解
@TableId(type = IdType.ASSIGN_ID)
private Long id;
基于ShardingSphere
修改配置文件
#------------------------分布式序列策略配置
# 分布式序列列名称
spring.shardingsphere.rules.sharding.tables.t_order.key-generate-strategy.column=id
# 分布式序列算法名称
spring.shardingsphere.rules.sharding.tables.t_order.key-generate-strategy.key-generator-name=alg_snowflake

# 分布式序列算法配置
# 分布式序列算法类型
spring.shardingsphere.rules.sharding.key-generators.alg_snowflake.type=SNOWFLAKE
# 分布式序列算法属性配置
#spring.shardingsphere.rules.sharding.key-generators.alg_snowflake.props.xxx=
修改实体类
//当配置了shardingsphere-jdbc的分布式序列时,自动使用shardingsphere-jdbc的分布式序列
//当没有配置shardingsphere-jdbc的分布式序列时,自动依赖数据库的主键自增策略
@TableId(type = IdType.AUTO)
分库分表查询
搭建
application.yml
server:
  port: 8081
spring:
  application:
    name: sharging-jdbc-demo
  shardingsphere:
    datasource:
      ## 三个数据库名称
      names: server-user,server-order0,server-order1
      server-order0:
        driver-class-name: com.mysql.jdbc.Driver
        jdbc-url: jdbc:mysql://192.168.43.89:3306/db_order
        password: 123456
        type: com.zaxxer.hikari.HikariDataSource
        username: root
      server-order1:
        driver-class-name: com.mysql.jdbc.Driver
        jdbc-url: jdbc:mysql://192.168.43.222:3306/db_order
        password: 123456
        type: com.zaxxer.hikari.HikariDataSource
        username: root
      server-user:
        driver-class-name: com.mysql.jdbc.Driver
        jdbc-url: jdbc:mysql://192.168.43.89:3306/db_user
        password: 123456
        type: com.zaxxer.hikari.HikariDataSource
        username: root
    props:
      sql-show: true
    mode:
      type: Memory
    rules:
      sharding:
        key-generators: # 设置主键策略
          alg_snowflake: # 主键名称
            type: SNOWFLAKE # 主键算法(雪花)
        sharding-algorithms:  ## 分片策略
          alg_mod: ## 策略名称
            props: ## 策略参数
              sharding-count: 2
            type: MOD # 策略类型
          alg_inline_userid: ## 第二个策略名称
            props: ## 参数
              algorithm-expression: server-order$->{user_id % 2} # 自定义计算规则
            type: INLINE  # 类型
          alg_hash_mod:
            props:
              sharding-count: 2
            type: HASH_MOD
        tables: ## 表
          t_order:  ## 订单逻辑表
              # 不同库中的真实表
            actual-data-nodes: server-order0.t_order0, server-order1.t_order0,server-order0.t_order1, server-order1.t_order1
            table-strategy: # 设置分表规则
              standard:
                sharding-algorithm-name: alg_hash_mod
                sharding-column: order_no
            database-strategy: # 设置分库规则
              standard:
                sharding-algorithm-name: alg_mod
                sharding-column: user_id
          t_user: # 用户表
            actual-data-nodes: server-user.t_user
          t_order_item: # 订单详情表 (表达式)
            actual-data-nodes: server-order$->{0..1}.t_order_item$->{0..1}
            table-strategy: # 设置分表规则
              standard:
                sharding-algorithm-name: alg_hash_mod
                sharding-column: order_no
            database-strategy: # 设置分库规则
              standard:
                sharding-algorithm-name: alg_mod
                sharding-column: user_id
            key-generate-strategy: # shardingsphere的主键生成策略,实体类用@TableId(type = IdType.AUTO)
              column: id # 使用主键生成策略的字段
              key-generator-name: alg_snowflake # 策略名称
实体类
import com.baomidou.mybatisplus.annotation.IdType;
import com.baomidou.mybatisplus.annotation.TableId;
import com.baomidou.mybatisplus.annotation.TableName;
import lombok.Data;

import java.math.BigDecimal;

@TableName("t_order")
@Data
public class Order {
    @TableId(type = IdType.ASSIGN_ID)
    private Long id;
    private String orderNo;
    private Long userId;
    private BigDecimal amount;
}
import com.baomidou.mybatisplus.annotation.IdType;
import com.baomidou.mybatisplus.annotation.TableId;
import com.baomidou.mybatisplus.annotation.TableName;
import lombok.Data;

import java.math.BigDecimal;

@TableName("t_order_item")
@Data
public class OrderItem {
    //当配置了shardingsphere-jdbc的分布式序列时,自动使用shardingsphere-jdbc的分布式序列
    @TableId(type = IdType.AUTO)
    private Long id;
    private String orderNo;
    private Long userId;
    private BigDecimal price;
    private Integer count;
}
mapper类
import com.baomidou.mybatisplus.core.mapper.BaseMapper;
import com.pj.entity.OrderItem;
import org.apache.ibatis.annotations.Mapper;
import org.apache.ibatis.annotations.Param;

import java.util.List;

@Mapper
public interface OrderItemMapper extends BaseMapper<OrderItem> {

    List<OrderItem> testQueryDb(Long userId);
    List<OrderItem> testQueryTb(String orderNo);
    List<OrderItem> testQueryDbAndTb(@Param("orderNo") String orderNo, @Param("userId") Long userId);

}
import com.baomidou.mybatisplus.core.mapper.BaseMapper;
import com.pj.entity.Order;
import org.apache.ibatis.annotations.Mapper;

@Mapper
public interface OrderMapper extends BaseMapper<Order> {
}
mapper.xml
<?xml version="1.0" encoding="UTF-8"?>
<!DOCTYPE mapper PUBLIC "-//mybatis.org//DTD Mapper 3.0//EN" "http://mybatis.org/dtd/mybatis-3-mapper.dtd">
<mapper namespace="com.pj.mapper.OrderItemMapper">


    <select id="testQueryDb" parameterType="java.lang.Long" resultType="com.pj.entity.OrderItem">
        select * from t_order_item WHERE order_no in(
            select order_no from t_order where user_id  = #{ userId}
        )
    </select>

    <select id="testQueryTb" parameterType="java.lang.String" resultType="com.pj.entity.OrderItem">
        select * from t_order_item WHERE order_no = #{ orderNo}
    </select>

    <select id="testQueryDbAndTb" resultType="com.pj.entity.OrderItem">
        select * from t_order_item WHERE order_no =#{ orderNo} and user_id = #{ userId}
    </select>
</mapper>
controller类
import com.pj.entity.Order;
import com.pj.entity.OrderItem;
import com.pj.mapper.OrderItemMapper;
import com.pj.mapper.OrderMapper;
import com.pj.mapper.TestMapper;
import com.pj.mapper.UserMapper;
import lombok.extern.slf4j.Slf4j;
import org.springframework.beans.factory.annotation.Autowired;
import org.springframework.web.bind.annotation.GetMapping;
import org.springframework.web.bind.annotation.RequestMapping;
import org.springframework.web.bind.annotation.RestController;
import java.math.BigDecimal;
import java.util.List;
@Slf4j
@RestController
@RequestMapping("/reQuery")
public class ReQueryController {
@Autowired
private UserMapper userMapper;
@Autowired
private OrderMapper orderMapper;
@Autowired
private OrderItemMapper orderItemMapper;
@Autowired
private TestMapper testMapper;
// 测试新增
@GetMapping("/testReInster")
public void test(){
for (long i = 1; i < 3; i++) {
Order order = new Order();
order.setOrderNo("ATGUIGU" + i);
order.setUserId(1L);
orderMapper.insert(order);
for (long j = 1; j < 3; j++) {
OrderItem orderItem = new OrderItem();
orderItem.setOrderNo("ATGUIGU" + i);
orderItem.setUserId(1L);
orderItem.setPrice(new BigDecimal(10));
orderItem.setCount(2);
orderItemMapper.insert(orderItem);
}
}
for (long i = 5; i < 7; i++) {
Order order = new Order();
order.setOrderNo("ATGUIGU" + i);
order.setUserId(2L);
orderMapper.insert(order);
for (long j = 1; j < 3; j++) {
OrderItem orderItem = new OrderItem();
orderItem.setOrderNo("ATGUIGU" + i);
orderItem.setUserId(2L);
orderItem.setPrice(new BigDecimal(1));
orderItem.setCount(3);
orderItemMapper.insert(orderItem);
}
}
}
// 测试查询
@GetMapping("/testReQusey")
public void testQuery(){
// 测试分库
log.info("测试分库>>>>>>>>>>>>>>>>>>>>>>>>>>>>>>>>>>>>>>>>>>>>>>>>>>>>>>>>");
log.info("查询库(1)-------------------------------------------------------");
List<OrderItem> orderItems = orderItemMapper.testQueryDb(1L);
log.info("查询库(2)-------------------------------------------------------");
List<OrderItem> orderItems2 = orderItemMapper.testQueryDb(2L);
// 测试分表
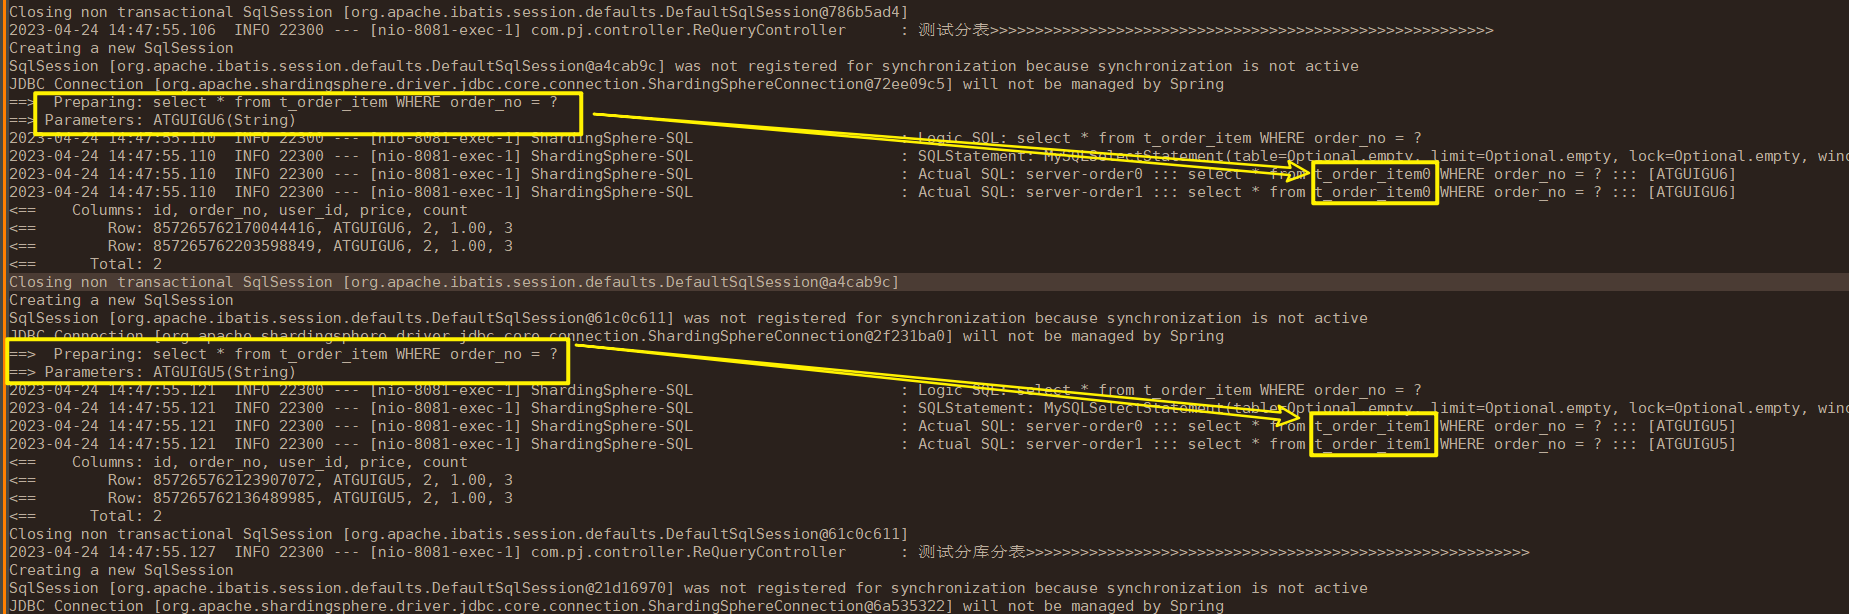
log.info("测试分表>>>>>>>>>>>>>>>>>>>>>>>>>>>>>>>>>>>>>>>>>>>>>>>>>>>>>>>>");
log.info("查询表(1)-------------------------------------------------------");
List<OrderItem> orderItems3 = orderItemMapper.testQueryTb("ATGUIGU6");
log.info("查询表(2)-------------------------------------------------------");
List<OrderItem> orderItems4 = orderItemMapper.testQueryTb("ATGUIGU5");
// 测试分库分表
log.info("测试分库分表>>>>>>>>>>>>>>>>>>>>>>>>>>>>>>>>>>>>>>>>>>>>>>>>>>>>>>>>");
List<OrderItem> orderItems5 = orderItemMapper.testQueryDbAndTb("ATGUIGU5",1L);
}
}
测试
http://localhost:8081/reQuery/testReQusey
测试分库
根据userid 分库
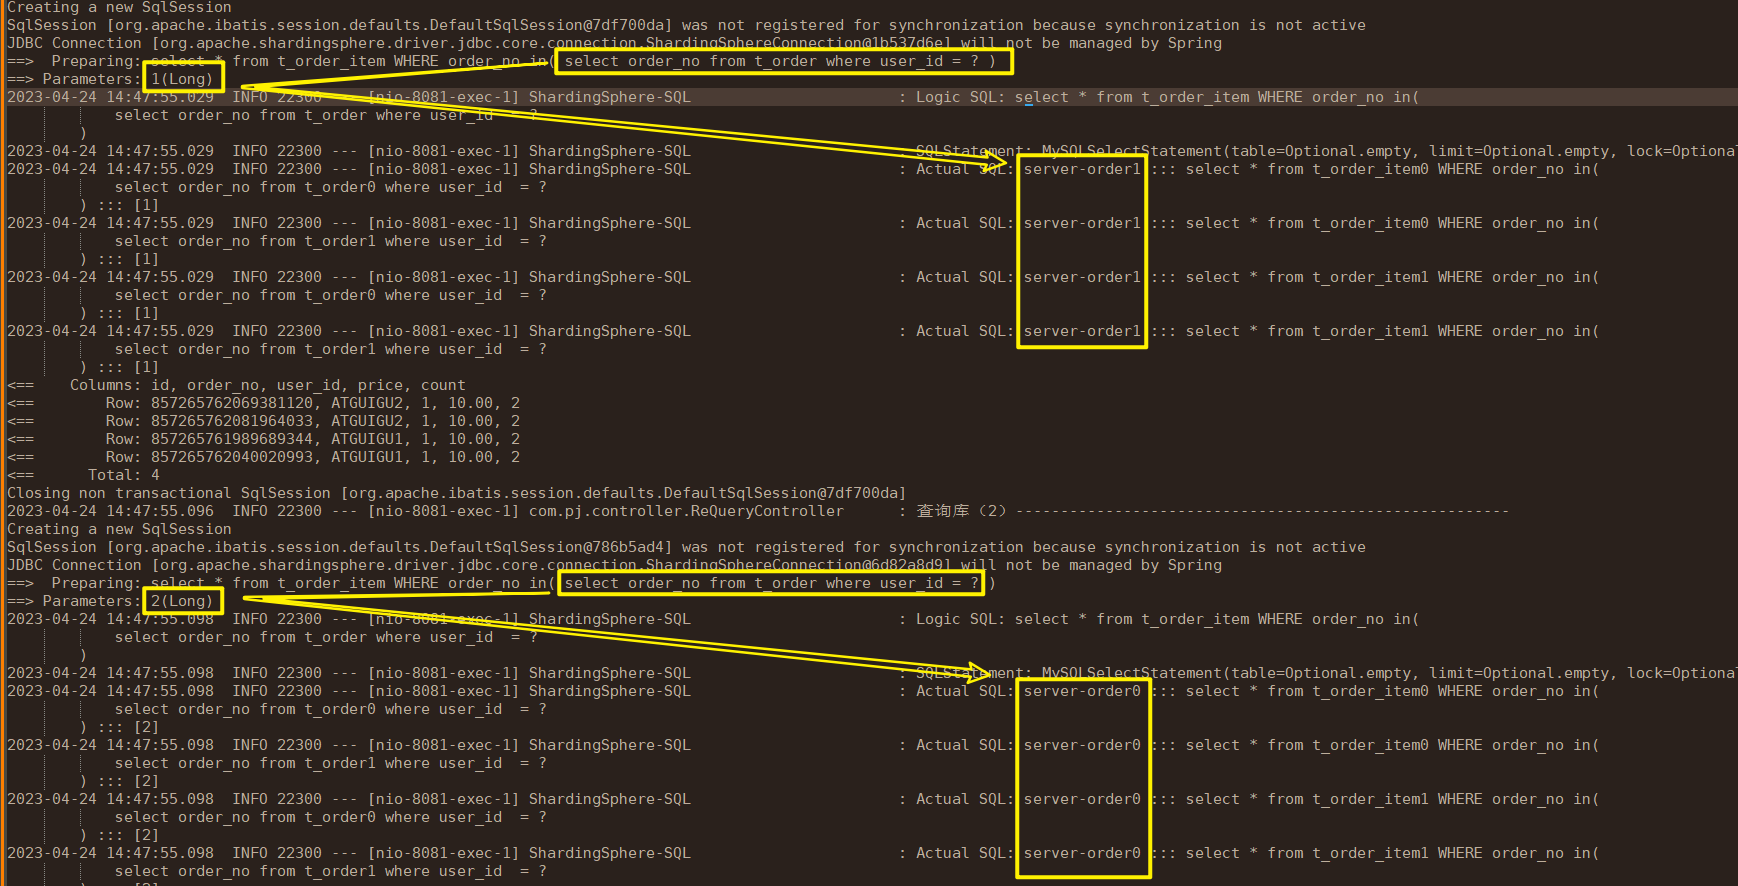
问题:当分片策略字段,作为子查询的时候,不会自动去分片后的表中查询,而是会出现笛卡尔积,这情况如何解决?
回答:看下面的绑定表
测试分表
根据orderNo分表
测试分库分表
根据userid 和 orderNo 分库分表(不会出现笛卡尔积)

绑定表
说明:当查询时,分表策略用到的字段,作为子查询的条件时,不会自动根据条件选择库和表,进行绑定后,再进行子查询时,则可以解决
需求:查询每个订单的订单号和总金额
新建VO
import lombok.Data;
import java.math.BigDecimal;

@Data
public class OrderVo {
    private String orderNo;
    private BigDecimal amount;
}
修改mapper
import com.baomidou.mybatisplus.core.mapper.BaseMapper;
import com.pj.entity.Order;
import com.pj.entity.OrderVo;
import org.apache.ibatis.annotations.Mapper;
import org.apache.ibatis.annotations.Select;

import java.util.List;

@Mapper
public interface OrderMapper extends BaseMapper<Order> {

    @Select({"SELECT o.order_no, SUM(i.price * i.count) AS amount",
            "FROM t_order o JOIN t_order_item i ON o.order_no = i.order_no",
            "GROUP BY o.order_no"})
    List<OrderVo> getOrderAmount();

}
新增controller
package com.pj.controller;

import com.pj.entity.OrderVo;
import com.pj.mapper.OrderMapper;
import org.springframework.beans.factory.annotation.Autowired;
import org.springframework.web.bind.annotation.GetMapping;
import org.springframework.web.bind.annotation.RequestMapping;
import org.springframework.web.bind.annotation.RestController;

import java.util.List;


@RestController
@RequestMapping("/binding")
public class BindingController {

    @Autowired
    OrderMapper orderMapper;

    @GetMapping("/test")
    public void test(){
        List<OrderVo> orderAmountList = orderMapper.getOrderAmount();
        orderAmountList.forEach(System.out::println);
    }

}
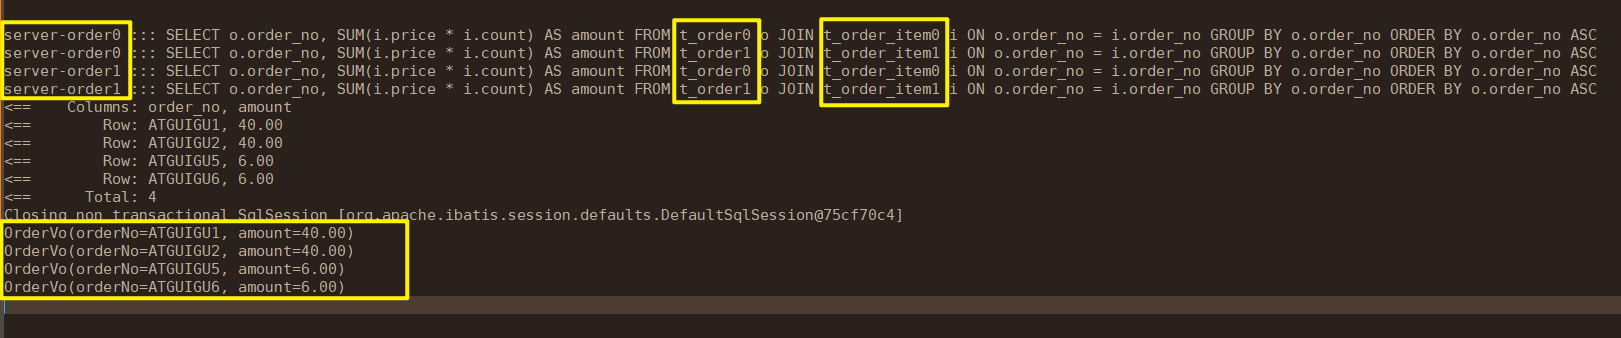
测试不绑定
8个sql,出现笛卡尔积,但其实 【t_order0】、【t_order_item1】并无关联关系,【t_order1】、【t_order_item0】也无关联关系
http://localhost:8081/binding/test

测试绑定表
- 新增配置
spring:
  shardingsphere:
    rules:
      sharding:
        binding-tables:
        - t_order,t_order_item
- 完整配置
server:
  port: 8081
spring:
  application:
    name: sharging-jdbc-demo
  shardingsphere:
    datasource:
      ## 三个数据库名称
      names: server-user,server-order0,server-order1
      server-order0:
        driver-class-name: com.mysql.jdbc.Driver
        jdbc-url: jdbc:mysql://192.168.43.89:3306/db_order
        password: 123456
        type: com.zaxxer.hikari.HikariDataSource
        username: root
      server-order1:
        driver-class-name: com.mysql.jdbc.Driver
        jdbc-url: jdbc:mysql://192.168.43.222:3306/db_order
        password: 123456
        type: com.zaxxer.hikari.HikariDataSource
        username: root
      server-user:
        driver-class-name: com.mysql.jdbc.Driver
        jdbc-url: jdbc:mysql://192.168.43.89:3306/db_user
        password: 123456
        type: com.zaxxer.hikari.HikariDataSource
        username: root
    props:
      sql-show: true
    mode:
      type: Memory
    rules:
      sharding:
        binding-tables: #绑定表
          - t_order,t_order_item
        key-generators: # 设置主键策略
          alg_snowflake: # 主键名称
            type: SNOWFLAKE # 主键算法(雪花)
        sharding-algorithms:  ## 分片策略
          alg_mod: ## 策略名称
            props: ## 策略参数
              sharding-count: 2
            type: MOD # 策略类型
          alg_inline_userid: ## 第二个策略名称
            props: ## 参数
              algorithm-expression: server-order$->{user_id % 2} # 自定义计算规则
            type: INLINE  # 类型
          alg_hash_mod:
            props:
              sharding-count: 2
            type: HASH_MOD
        tables: ## 表
          t_order:  ## 订单逻辑表
            #actual-data-nodes: server-order0.t_order0, server-order1.t_order0,server-order0.t_order1, server-order1.t_order1 # 不同库中的真实表
            #actual-data-nodes: server-order0.t_order0, server-order0.t_order1, server-order1.t_order0, server-order1.t_order1 # 不同库中的真实表
            actual-data-nodes: server-order$->{0..1}.t_order$->{0..1} # 不同库中的真实表
            table-strategy: # 设置分表规则
              standard:
                sharding-algorithm-name: alg_hash_mod
                sharding-column: order_no
            database-strategy: # 设置分库规则
              standard:
                sharding-algorithm-name: alg_mod
                sharding-column: user_id

          t_user: # 用户表
            actual-data-nodes: server-user.t_user

          t_order_item: # 订单详情表 (表达式)
            actual-data-nodes: server-order$->{0..1}.t_order_item$->{0..1}
            table-strategy: # 设置分表规则
              standard:
                sharding-algorithm-name: alg_hash_mod
                sharding-column: order_no
            database-strategy: # 设置分库规则
              standard:
                sharding-algorithm-name: alg_mod
                sharding-column: user_id
            key-generate-strategy: # shardingsphere的主键生成策略,实体类用@TableId(type = IdType.AUTO)
              column: id # 使用主键生成策略的字段
              key-generator-name: alg_snowflake # 策略名称
- 测试

错误(查询结构不对)
- 错误描述
应当是
FROM t_order0 o JOIN t_order_item0
FROM t_order1 o JOIN t_order_item1
FROM t_order0 o JOIN t_order_item0
FROM t_order1 o JOIN t_order_item1
而实际是
FROM t_order0 o JOIN t_order_item0
FROM t_order0 o JOIN t_order_item1
FROM t_order1 o JOIN t_order_item0
FROM t_order1 o JOIN t_order_item1
- 解决方案
配置逻辑表名时出现的问题
不能写成这样
actual-data-nodes: server-order0.t_order0, server-order1.t_order0,server-order0.t_order1, server-order1.t_order1
应该写成这样
actual-data-nodes: server-order0.t_order0, server-order0.t_order1, server-order1.t_order0, server-order1.t_order1
或者这样
actual-data-nodes: server-order$->{0..1}.t_order$->{0..1}
相同的数据库逻辑名,必须要挨在一起才行
再次测试
数据正常
广播表
说明:广播表,一般指所有库都有,并且不会经常变动的表,比如字典表
准备
所有库
CREATE TABLE t_dict(
    id BIGINT,
    dict_type VARCHAR(200),
    PRIMARY KEY(id)
);
搭建
新增配置
spring:
  shardingsphere:
    rules:
      sharding:
        broadcast-tables:
          - t_dict
        tables:
          t_dict:
            actual-data-nodes: server-user.t_dict,server-order$->{0..1}.t_dict
- 完整配置
server:
  port: 8081
spring:
  application:
    name: sharging-jdbc-demo
  shardingsphere:
    datasource:
      ## 三个数据库名称
      names: server-user,server-order0,server-order1
      server-order0:
        driver-class-name: com.mysql.jdbc.Driver
        jdbc-url: jdbc:mysql://192.168.43.89:3306/db_order
        password: 123456
        type: com.zaxxer.hikari.HikariDataSource
        username: root
      server-order1:
        driver-class-name: com.mysql.jdbc.Driver
        jdbc-url: jdbc:mysql://192.168.43.222:3306/db_order
        password: 123456
        type: com.zaxxer.hikari.HikariDataSource
        username: root
      server-user:
        driver-class-name: com.mysql.jdbc.Driver
        jdbc-url: jdbc:mysql://192.168.43.89:3306/db_user
        password: 123456
        type: com.zaxxer.hikari.HikariDataSource
        username: root
    props:
      sql-show: true
    mode:
      type: Memory
    rules:
      sharding:
        broadcast-tables: # 广播表
          - t_dict
        binding-tables: # 绑定表
          - t_order,t_order_item
        key-generators: # 设置主键策略
          alg_snowflake: # 主键名称
            type: SNOWFLAKE # 主键算法(雪花)
        sharding-algorithms:  ## 分片策略
          alg_mod: ## 策略名称
            props: ## 策略参数
              sharding-count: 2
            type: MOD # 策略类型
          alg_inline_userid: ## 第二个策略名称
            props: ## 参数
              algorithm-expression: server-order$->{user_id % 2} # 自定义计算规则
            type: INLINE  # 类型
          alg_hash_mod:
            props:
              sharding-count: 2
            type: HASH_MOD
        tables: ## 表
          t_dict:
            actual-data-nodes: server-user.t_dict,server-order$->{0..1}.t_dict
          t_order:  ## 订单逻辑表
            actual-data-nodes: server-order$->{0..1}.t_order$->{0..1} # 不同库中的真实表
            table-strategy: # 设置分表规则
              standard:
                sharding-algorithm-name: alg_hash_mod
                sharding-column: order_no
            database-strategy: # 设置分库规则
              standard:
                sharding-algorithm-name: alg_mod
                sharding-column: user_id
          t_user: # 用户表
            actual-data-nodes: server-user.t_user
          t_order_item: # 订单详情表 (表达式)
            actual-data-nodes: server-order$->{0..1}.t_order_item$->{0..1}
            table-strategy: # 设置分表规则
              standard:
                sharding-algorithm-name: alg_hash_mod
                sharding-column: order_no
            database-strategy: # 设置分库规则
              standard:
                sharding-algorithm-name: alg_mod
                sharding-column: user_id
            key-generate-strategy: # shardingsphere的主键生成策略,实体类用@TableId(type = IdType.AUTO)
              column: id # 使用主键生成策略的字段
              key-generator-name: alg_snowflake # 策略名称
新增mapper
import com.baomidou.mybatisplus.core.mapper.BaseMapper;
import com.pj.entity.Dict;
import org.apache.ibatis.annotations.Mapper;

@Mapper
public interface DictMapper extends BaseMapper<Dict> {
}
新增实体类
import com.baomidou.mybatisplus.annotation.IdType;
import com.baomidou.mybatisplus.annotation.TableId;
import com.baomidou.mybatisplus.annotation.TableName;
import lombok.Data;


@TableName("t_dict")
@Data
public class Dict {
    //可以使用MyBatisPlus的雪花算法
    @TableId(type = IdType.ASSIGN_ID)
    private Long id;
    private String dictType;
}
新增Controller
import com.pj.entity.Dict;
import com.pj.mapper.DictMapper;
import org.checkerframework.checker.units.qual.A;
import org.springframework.beans.factory.annotation.Autowired;
import org.springframework.web.bind.annotation.GetMapping;
import org.springframework.web.bind.annotation.RequestMapping;
import org.springframework.web.bind.annotation.RestController;

import java.util.List;

@RestController
@RequestMapping("br")
public class BrController {

    @Autowired
    DictMapper dictMapper;

    // 新增
    @GetMapping("/test")
    public void testInster(){
        Dict dict = new Dict();
        dict.setDictType("type1");
        dictMapper.insert(dict);
    }

    /**
     * 查询操作,只从一个节点获取数据
     * 随机负载均衡规则
     */
    @GetMapping("testQuery")
    public void testQuery(){
        List<Dict> dicts = dictMapper.selectList(null);
        dicts.forEach(System.out::println);
    }
}
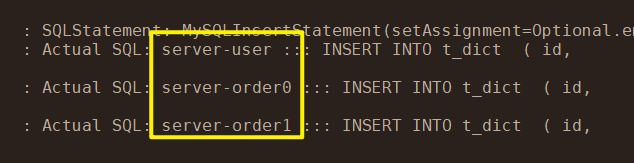
测试
测试新增
三个表都新增
http://localhost:8081/br/test
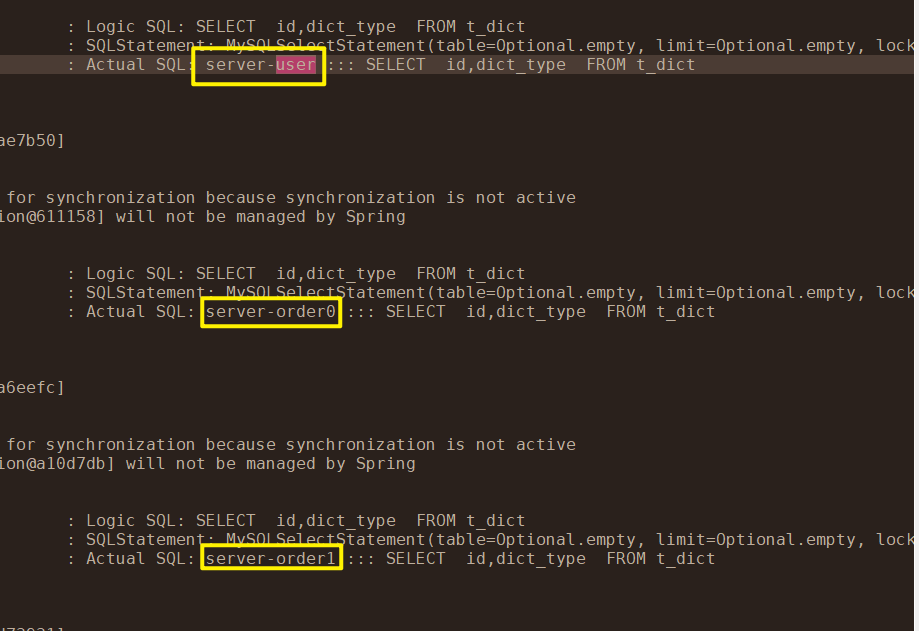
测试查询
自带负载均衡
http://localhost:8081/br/testQuery
测试分页
pom(升级一下mybatisplus)
<!-- https://mvnrepository.com/artifact/com.baomidou/mybatis-plus-boot-starter -->
<dependency>
    <groupId>com.baomidou</groupId>
    <artifactId>mybatis-plus-boot-starter</artifactId>
    <version>3.5.3.1</version>
</dependency>
分页插件
import com.baomidou.mybatisplus.annotation.DbType;
import com.baomidou.mybatisplus.extension.plugins.MybatisPlusInterceptor;
import com.baomidou.mybatisplus.extension.plugins.inner.PaginationInnerInterceptor;
import org.springframework.context.annotation.Bean;
import org.springframework.context.annotation.Configuration;

/**
 * @Auther: IT贱男
 * @Date: 2019/6/12 15:06
 * @Description: MybatisPlus配置类
 */
@Configuration
public class MyBatisPlusConfig {

    /**
     * 新的分页插件,一缓和二缓遵循mybatis的规则,需要设置 MybatisConfiguration#useDeprecatedExecutor = false 避免缓存出现问题(该属性会在旧插件移除后一同移除)
     */
    @Bean
    public MybatisPlusInterceptor mybatisPlusInterceptor() {
        MybatisPlusInterceptor interceptor = new MybatisPlusInterceptor();
        interceptor.addInnerInterceptor(new PaginationInnerInterceptor(DbType.MYSQL));
        return interceptor;
    }

}
配置文件
server:
  port: 8081
spring:
  application:
    name: sharging-jdbc-demo
  shardingsphere:
    datasource:
      ## 三个数据库名称
      names: server-order0,server-order1
      server-order0:
        driver-class-name: com.mysql.jdbc.Driver
        jdbc-url: jdbc:mysql://192.168.31.17:3306/db_order
        password: 123456
        type: com.zaxxer.hikari.HikariDataSource
        username: root
      server-order1:
        driver-class-name: com.mysql.jdbc.Driver
        jdbc-url: jdbc:mysql://192.168.31.17:3306/db_order2
        password: 123456
        type: com.zaxxer.hikari.HikariDataSource
        username: root
    props:
      sql-show: true
    mode:
      type: Memory
    rules:
      sharding:
        key-generators: # 设置主键策略
          alg_snowflake: # 主键名称
            type: SNOWFLAKE # 主键算法(雪花)
        sharding-algorithms:  ## 分片策略
          alg_mod: ## 策略名称
            props: ## 策略参数
              sharding-count: 2
            type: MOD # 策略类型
          alg_inline_userid: ## 第二个策略名称
            props: ## 参数
              algorithm-expression: server-order$->{user_id % 2} # 自定义计算规则
            type: INLINE  # 类型
          alg_hash_mod:
            props:
              sharding-count: 2
            type: HASH_MOD
        tables: ## 表
          t_order:  ## 订单逻辑表
            actual-data-nodes: server-order0.t_order0, server-order1.t_order0,server-order0.t_order1, server-order1.t_order1 # 不同库中的真实表
            table-strategy: # 设置分表规则
              standard:
                sharding-algorithm-name: alg_hash_mod
                sharding-column: order_no
            database-strategy: # 设置分库规则
              standard:
                sharding-algorithm-name: alg_mod
                sharding-column: user_id
controller
package com.pj.controller;

import com.baomidou.mybatisplus.core.conditions.query.QueryWrapper;
import com.baomidou.mybatisplus.extension.plugins.pagination.Page;
import com.pj.entity.Order;
import com.pj.entity.OrderItem;
import com.pj.mapper.OrderItemMapper;
import com.pj.mapper.OrderMapper;
import com.pj.mapper.TestMapper;
import com.pj.mapper.UserMapper;
import org.springframework.beans.factory.annotation.Autowired;
import org.springframework.web.bind.annotation.GetMapping;
import org.springframework.web.bind.annotation.RequestMapping;
import org.springframework.web.bind.annotation.RestController;

import java.math.BigDecimal;

/**
 * @Auther: java0
 * @Date: 2023/4/28 21:47
 * @Description: PageController
 * @Version 1.0.0
 */
@RestController
@RequestMapping("/page")
public class PageController {

    @Autowired
    private OrderMapper orderMapper;

    @GetMapping("/testReInster")
    public void test(){
        for (long i = 1; i < 100; i++) {
            Order order = new Order();
            order.setId(i);
            order.setOrderNo("ATGUIGU1");
            order.setUserId(1L);
            orderMapper.insert(order);
        }
        for (long i = 101; i < 200; i++) {
            Order order = new Order();
            order.setId(i);
            order.setOrderNo("ATGUIGU2");
            order.setUserId(2L);
            orderMapper.insert(order);
        }
    }

    @GetMapping("/testAllPage")
    private Page<Order> testAllPage(long current, long size){
        Page<Order> page = new Page<>(current,size);
        QueryWrapper<Order> queryWrapper = new QueryWrapper<>();
        queryWrapper.orderByAsc("id");
        page = orderMapper.selectPage(page,queryWrapper);
        return page;
    }

    @GetMapping("/testPage1")
    private Page<Order> testQuery1(long current, long size){
        Page<Order> page = new Page<>(current,size);
        QueryWrapper<Order> queryWrapper = new QueryWrapper<>();
        queryWrapper.eq("user_id","1");
        queryWrapper.orderByAsc("id");
        page = orderMapper.selectPage(page,queryWrapper);
        return page;
    }

    @GetMapping("/testPage2")
    private Page<Order> testQuery2(long current, long size){
        Page<Order> page = new Page<>(current,size);
        QueryWrapper<Order> queryWrapper = new QueryWrapper<>();
        queryWrapper.eq("order_no","ATGUIGU1");
        queryWrapper.orderByAsc("id");
        page = orderMapper.selectPage(page,queryWrapper);
        return page;
    }

    @GetMapping("/testPage3")
    private Page<Order> testQuery3(long current, long size){
        Page<Order> page = new Page<>(current,size);
        QueryWrapper<Order> queryWrapper = new QueryWrapper<>();
        queryWrapper.eq("user_id","1");
        queryWrapper.eq("order_no","ATGUIGU1");
        queryWrapper.orderByAsc("id");
        page = orderMapper.selectPage(page,queryWrapper);
        return page;
    }

}
测试
不写分片条件
http://localhost:8081/page/testAllPage?current=5&size=10
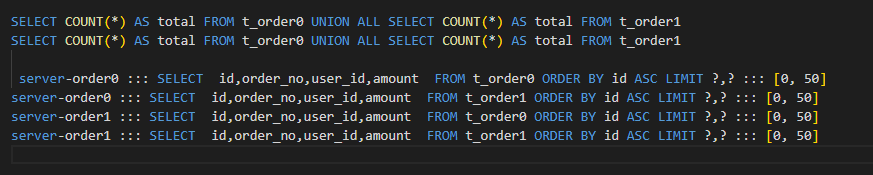
用 union 来查询所有的条数
比如size=10、current=5时,会查询所有库的前50条
然后在内部进行判断排序。
这样能保证不漏数据
只传分库字段
http://localhost:8081/page/testPage1?current=5&size=10

只查询了 order1库,也是查询了前50条
只分开库不分表
http://localhost:8081/page/testPage2?current=5&size=10

查询了两个库中的order1表,也是查询了50条
分库分表
http://localhost:8081/page/testPage4?current=5&size=10

精准查询,而且只查询了10条数据