出处
https://blog.csdn.net/ShuSheng0007/article/details/125921491
战前准备
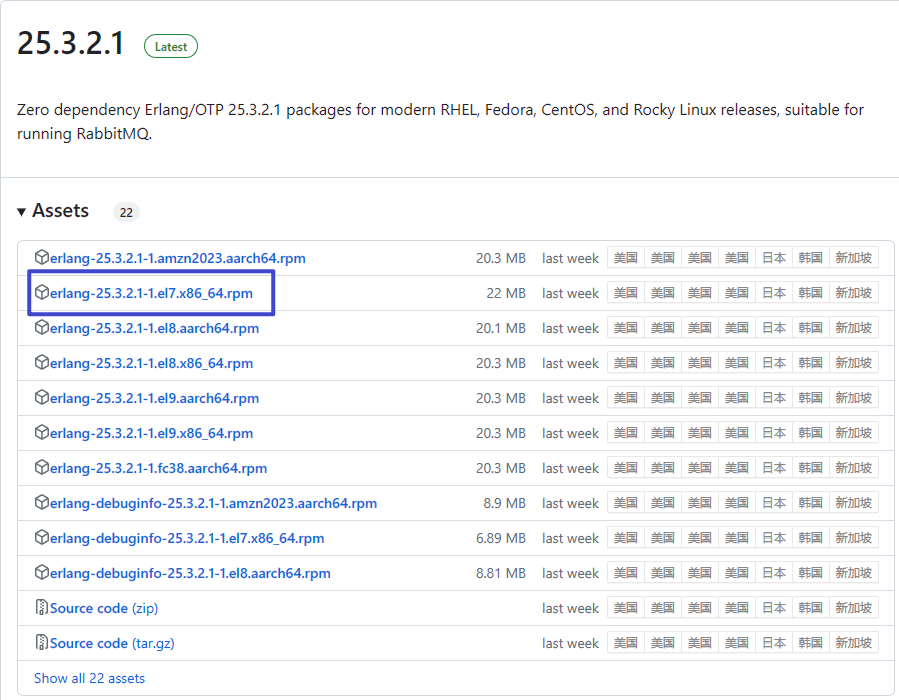
下载erlang
https://github.com/rabbitmq/erlang-rpm/releases
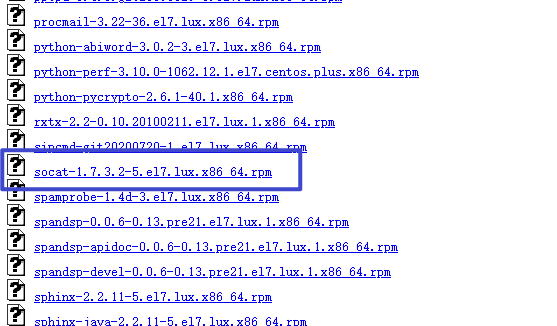
下载socat
http://repo.iotti.biz/CentOS/7/x86_64/
下载rabbitmq
https://github.com/rabbitmq/rabbitmq-server/releases
安装
安装依赖
yum -y install build-essential openssl openssl-devel unixODBC unixODBC-devel make gcc gcc-c++ kernel-devel m4 ncurses-devel tk tc xz
安装erlang
rpm -ivh erlang-25.3.2.1-1.el7.x86_64.rpm
安装socat
rpm -ivh socat-1.7.3.2-5.el7.lux.x86_64.rpm
安装rabbitmq
rpm ivh rabbitmq-server-3.11.18-1.el8.noarch.rpm
启动与关闭
启动
service rabbitmq-server start
停止
service rabbitmq-server stop
重启
service rabbitmq-server restart
查看状态
service rabbitmq-server status
设置开机启动
chkconfig rabbitmq-server on
安装管理插件
rabbitmq-plugins enable rabbitmq_management
访问控制台
http://192.168.31.162:15672/
账号密码都是 guest
会报如下错:
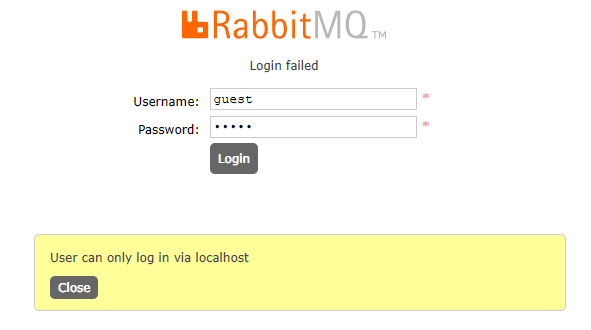
这是因为RabbitMQ默认只允许guest在服务器本地登录,我们需要重新创建账号
#第一步:添加 admin 用户并设置密码
rabbitmqctl add_user admin 123456
#第二步:添加 admin 用户为administrator角色
rabbitmqctl set_user_tags admin administrator
#第三步:设置 admin 用户的权限,指定允许访问的vhost以及write/read
rabbitmqctl set_permissions -p "/" admin ".*" ".*" ".*"
#第四步:查看vhost(/)允许哪些用户访问
rabbitmqctl list_permissions -p /
#第五步:查看用户列表
rabbitmqctl list_users
#第六步:重启RabbitMQ,然后用设置账户和密码登录。
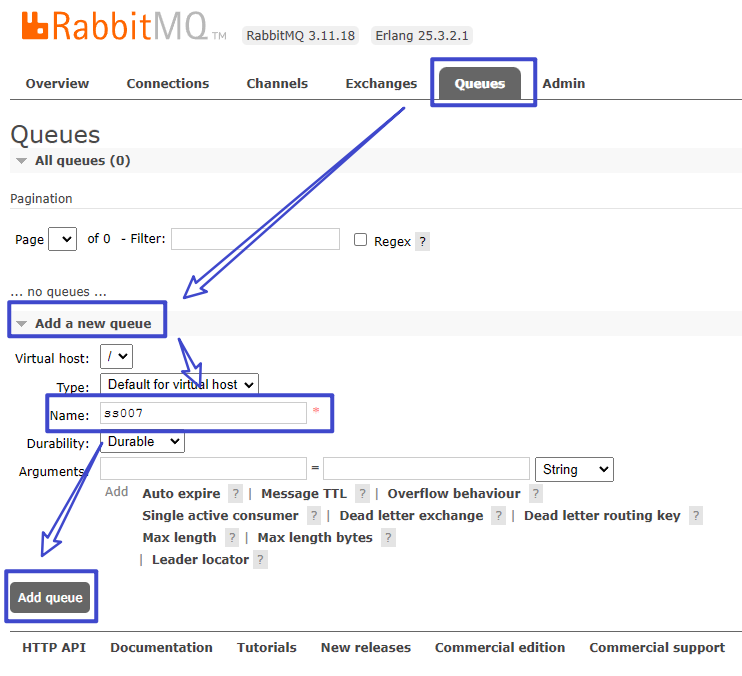
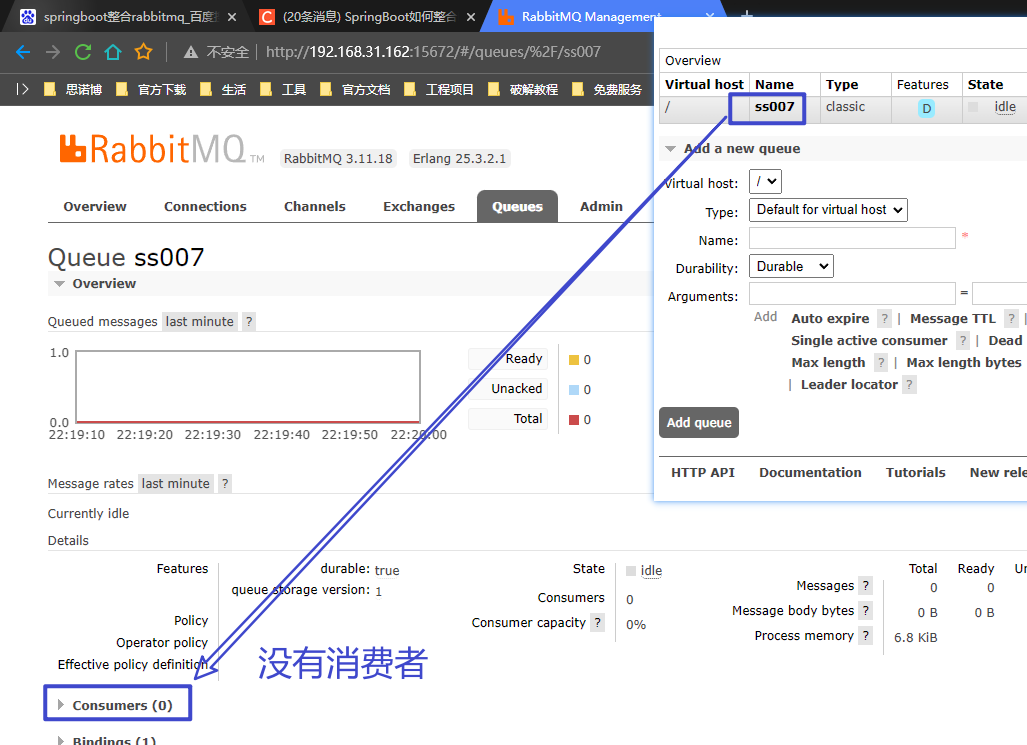
创建一个queue
创建queue
查看详情
springboot整合rabbitmq
pom
<!--rabbitmq-->
<dependency>
    <groupId>org.springframework.boot</groupId>
    <artifactId>spring-boot-starter-amqp</artifactId>
</dependency>
application.yml
spring:
  rabbitmq:
    host: 192.168.31.162
    port: 5672
    username: admin
    password: 123456
修改启动类
import org.springframework.amqp.rabbit.annotation.EnableRabbit;
import org.springframework.boot.SpringApplication;
import org.springframework.boot.autoconfigure.SpringBootApplication;
import org.springframework.core.env.Environment;

// 需要加此注解
@EnableRabbit
@SpringBootApplication
public class RabbitApplication {

    public static void main(String[] args) {
        Environment env = new SpringApplication(RabbitApplication.class).run(args).getEnvironment();;
        System.out.println("启动成功: http://localhost:"+ env.getProperty("server.port") );
    }
}
创建一个监听者
监听队列名 ss007
import lombok.extern.slf4j.Slf4j;
import org.springframework.amqp.rabbit.annotation.RabbitListener;
import org.springframework.messaging.handler.annotation.Payload;
import org.springframework.stereotype.Service;

@Slf4j
@Service
public class QueueConsumer {
    @RabbitListener(queues = {"ss007"})
    public void receive(@Payload String fileBody) {
        log.info("ss007队列:" + fileBody);
    }
}
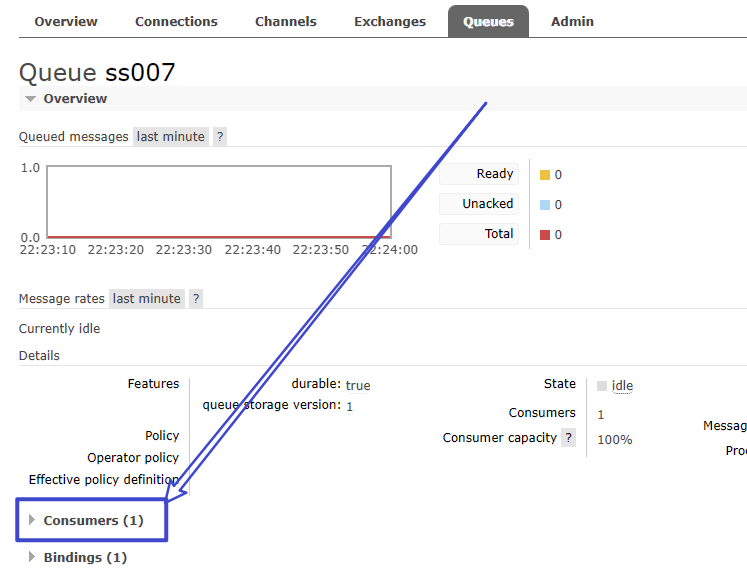
启动项目后,发现有了一个监听者
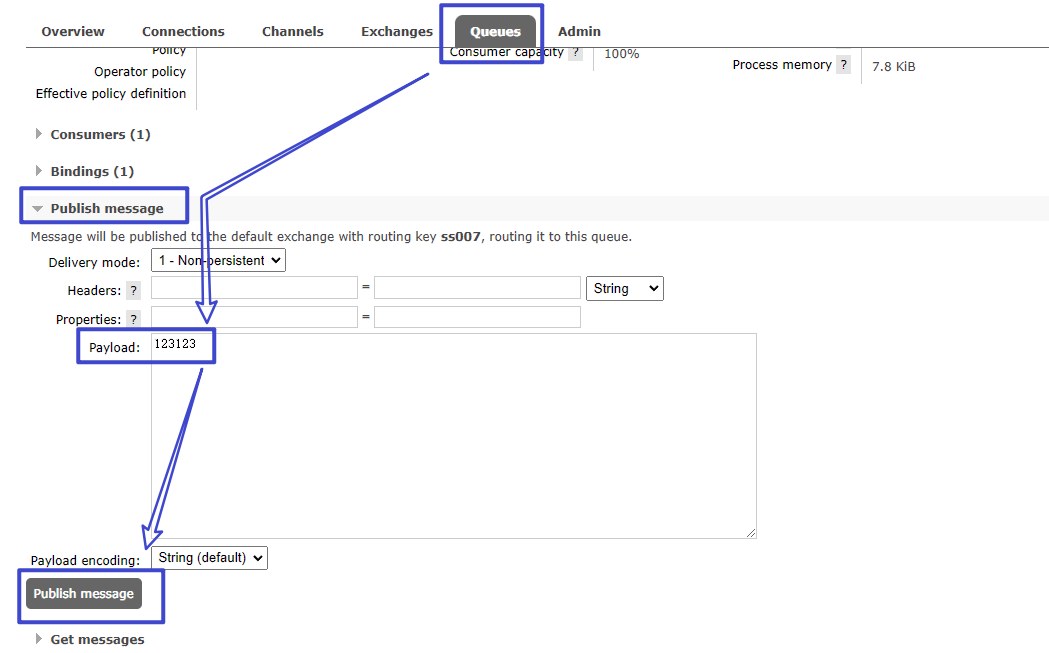
测试发送一个消息
发现java中已经监听到
创建生产者
创建消息bean
import org.springframework.amqp.core.Queue;
import org.springframework.context.annotation.Bean;
import org.springframework.context.annotation.Configuration;

@Configuration
public class RabbitConfig {
    @Bean
    public Queue myQueue(){
        return new Queue("ss007",true);
    }
}
创建发送方法
import lombok.RequiredArgsConstructor;
import org.springframework.amqp.core.Queue;
import org.springframework.amqp.rabbit.core.RabbitTemplate;
import org.springframework.stereotype.Service;

@RequiredArgsConstructor
@Service
public class SendService {

    private final RabbitTemplate rabbitTemplate;
    private final Queue myQueue;

    public void sendMsg(String msg){
        rabbitTemplate.convertAndSend(myQueue.getName(),msg);
    }
}
创建 controller
import com.xiong.demo.send.SendService;
import lombok.RequiredArgsConstructor;
import org.springframework.web.bind.annotation.GetMapping;
import org.springframework.web.bind.annotation.RequestMapping;
import org.springframework.web.bind.annotation.RequestParam;
import org.springframework.web.bind.annotation.RestController;

@RequiredArgsConstructor
@RestController
@RequestMapping("/trigger")
public class TriggerController {

    private final SendService sendService;
    @GetMapping("/send")
    public String sendMsgToMq(@RequestParam String msg){
        sendService.sendMsg(msg);
        return "ok";
    }
}
主题与队列Exchange
在工程实践中一般还是推荐显式指定Exchange以及RoutingKey的
java配置
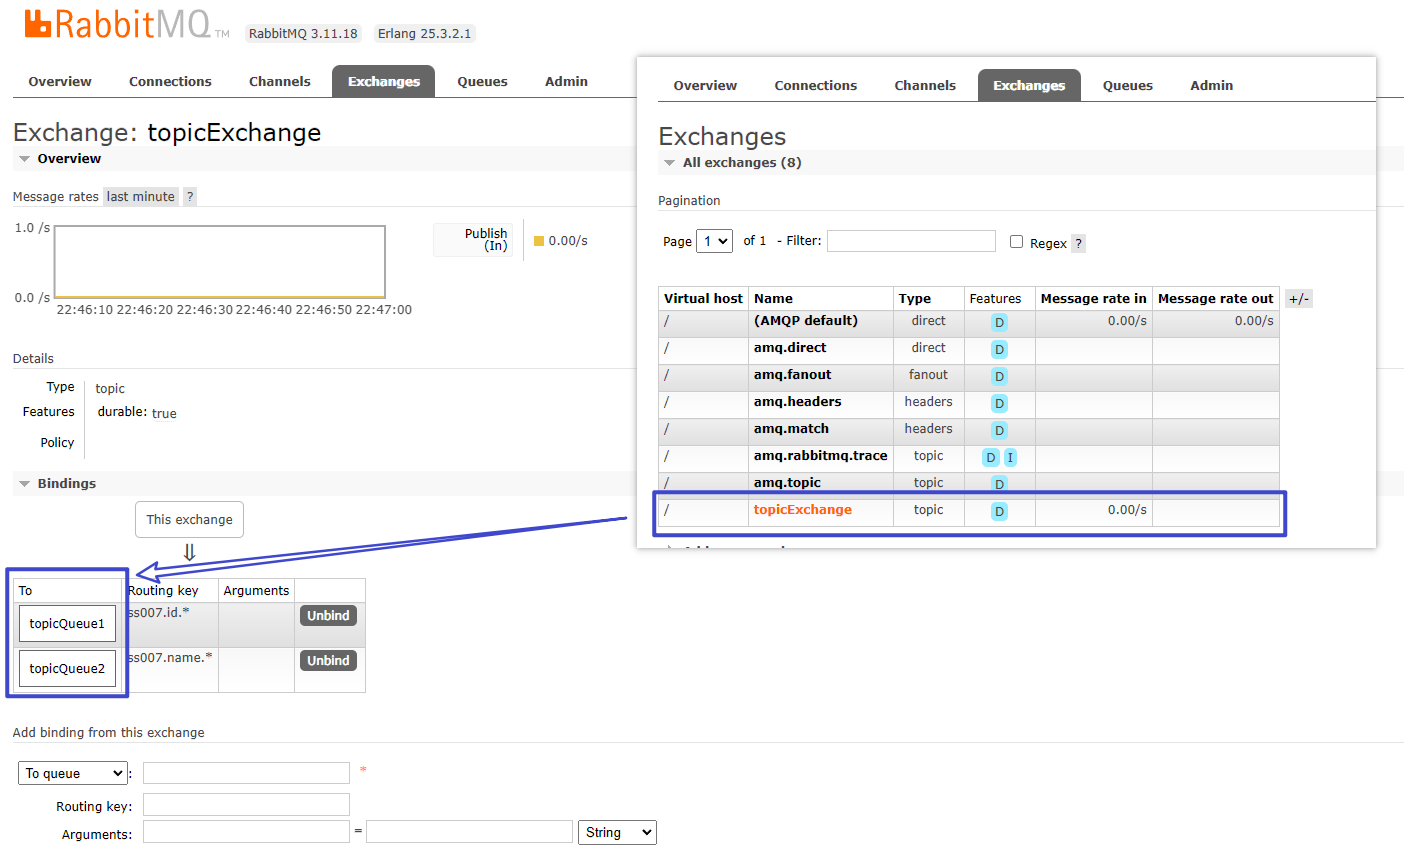
以下的代码创建了一个Exchange,两个队列,并将这两个队列绑定到了那个Exchange上。注意两个绑定使用的routingkey是不一样的。
import org.springframework.amqp.core.Binding;
import org.springframework.amqp.core.BindingBuilder;
import org.springframework.amqp.core.Queue;
import org.springframework.amqp.core.TopicExchange;
import org.springframework.context.annotation.Bean;
import org.springframework.context.annotation.Configuration;

@Configuration
public class RabbitConfig {

    //以下的代码创建了一个Exchange,两个队列,并将这两个队列绑定到了那个Exchange上。注意两个绑定使用的routingkey是不一样的。
    @Bean
    public Queue topicQueue1(){
        return new Queue("topicQueue1",true);
    }

    @Bean
    public Queue topicQueue2(){
        return new Queue("topicQueue2",true);
    }

    @Bean
    public TopicExchange topicExchange(){
        return new TopicExchange("topicExchange");
    }

    @Bean
    public Binding topicBinding1(){
        return BindingBuilder.bind(topicQueue1()).to(topicExchange())
                .with("ss007.id.*");
    }

    @Bean
    public Binding topicBinding2(){
        return BindingBuilder.bind(topicQueue2()).to(topicExchange())
                .with("ss007.name.*");
    }

}
新增两个消费者
@RabbitListener(queues = {"topicQueue1"})
public void receiveTopic1(@Payload String fileBody) {
    log.info("topic1队列:" + fileBody);
}

@RabbitListener(queues = {"topicQueue2"})
public void receiveTopic2(@Payload String fileBody) {
    log.info("topic2队列:" + fileBody);
}
发送消息方法
public void sendTopicMsg(String msg,String route){
    rabbitTemplate.convertAndSend("topicExchange",route,msg);
}
启动项目后
发现已经有了自己设置的
写两个controller
 @GetMapping("/send2")
public String send2(){
    sendService.sendTopicMsg("测试方法1","ss007.id.撒旦发射点");
    return "ok";
}

@GetMapping("/send3")
public String send3(){
    sendService.sendTopicMsg("测试方法1","ss007.name.撒旦发射点");
    return "ok";
}
延时消息
安装延时消息插件
首先我们要了解我们本机Rabbitmq安装位置
打开本机Rabbitmq安装位置 ==>进入plugins文件夹中
cd /usr/lib/rabbitmq/lib/rabbitmq_server-3.11.18
下载插件
将下载的文件拷贝到plugins这个文件夹下
https://github.com/rabbitmq/rabbitmq-delayed-message-exchange/releases
路径选择进入到sbin文件夹下
rabbitmq-plugins enable rabbitmq_delayed_message_exchange
重启
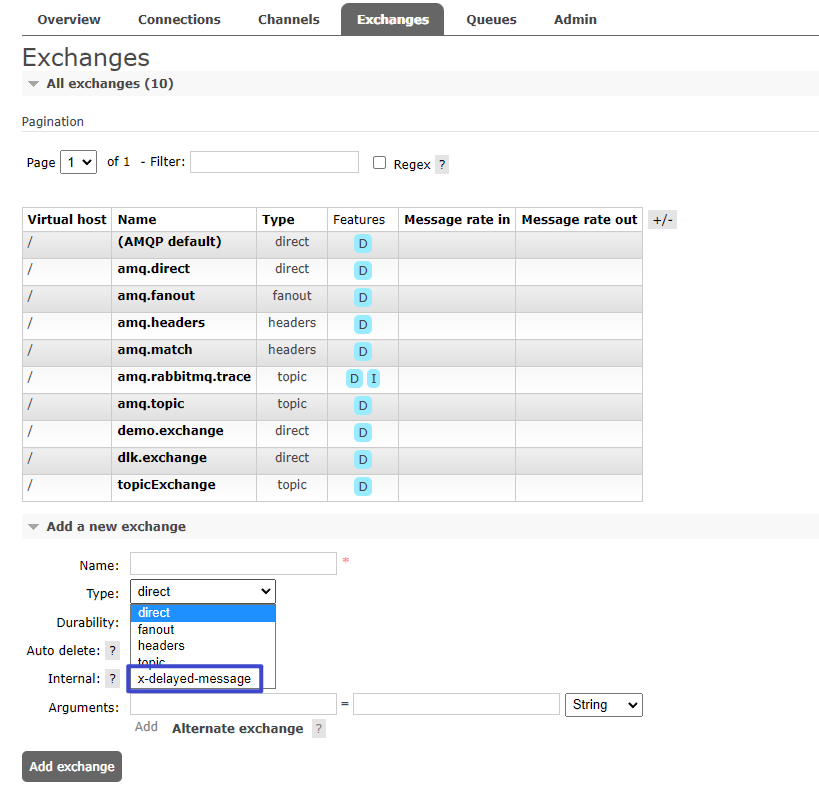
右此选项则成功
整合springboot
新增配置文件
package com.xiong.demo.config;


import org.springframework.amqp.core.*;
import org.springframework.context.annotation.Bean;
import org.springframework.context.annotation.Configuration;
import java.util.HashMap;
import java.util.Map;

//todo 总结: 当过期时间不一致时 不能使用死信队列
//当我往死信队列中发送两条不同过期时间的消息时,如果先发送的消息A的过期时间大于后发送的消息B的过期时间时,由于消息的顺序消费,
// 消息B过期后并不会立即重新publish到死信交换机,而是会等到消息A过期后一起被消费。
//依次发送两个请求http://localhost:4399/send?msg=消息A&time=30和http://localhost:4399/send?msg=消息B&time=10,
// 消息A先发送,过期时间30S,消息B后发送,过期时间10S,我们想要的结果应该是10S收到消息B,30S后收到消息A,但结果并不是,控制台输出如下:
//2020-12-16 22:54:47.339  INFO 13304 --- [nio-4399-exec-5] c.l.rabbitmqdlk.rabbitmq.MessageSender   : 使用死信队列消息:消息A发送成功,过期时间:30秒。
//2020-12-16 22:54:54.278  INFO 13304 --- [nio-4399-exec-6] c.l.rabbitmqdlk.rabbitmq.MessageSender   : 使用死信队列消息:消息B发送成功,过期时间:10秒。
//2020-12-16 22:55:17.356  INFO 13304 --- [ntContainer#0-1] c.l.r.rabbitmq.MessageReceiver           : 使用死信队列,收到消息:消息A
//2020-12-16 22:55:17.357  INFO 13304 --- [ntContainer#0-1] c.l.r.rabbitmq.MessageReceiver           : 使用死信队列,收到消息:消息B
//消息A30S后被成功消费,紧接着消息B被消费。因此当我们使用死信队列时应该注意是否消息的过期时间都是一样的,比如订单超过10分钟未支付修改其状态。
// 如果当一个队列各个消息的过期时间不一致时,使用死信队列就可能达不到延时的作用。这时候我们可以使用延时插件来实现这需求。
//死信交换机,队列,路由相关配置
@Configuration
public class YSRabbitmqConfig {

    //死信交换机,队列,路由相关配置
    public static final String DLK_EXCHANGE = "dlk.exchange";
    public static final String DLK_ROUTEKEY = "dlk.routeKey";
    public static final String DLK_QUEUE = "dlk.queue";

    //业务交换机,队列,路由相关配置
    public static final String DEMO_EXCHANGE = "demo.exchange";
    public static final String DEMO_QUEUE = "demo.queue";
    public static final String DEMO_ROUTEKEY = "demo.routeKey";

    //延时插件DelayedMessagePlugin的交换机,队列,路由相关配置
    public static final String DMP_EXCHANGE = "dmp.exchange";
    public static final String DMP_ROUTEKEY = "dmp.routeKey";
    public static final String DMP_QUEUE = "dmp.queue";

    @Bean
    public DirectExchange demoExchange(){
        return new DirectExchange(DEMO_EXCHANGE,true,false);
    }

    @Bean
    public Queue demoQueue(){
        //只需要在声明业务队列时添加x-dead-letter-exchange,值为死信交换机
        Map<String,Object> map = new HashMap<>(1);
        map.put("x-dead-letter-exchange",DLK_EXCHANGE);
        //该参数x-dead-letter-routing-key可以修改该死信的路由key,不设置则使用原消息的路由key
        map.put("x-dead-letter-routing-key",DLK_ROUTEKEY);
        return new Queue(DEMO_QUEUE,true,false,false,map);
    }

    @Bean
    public Binding demoBind(){
        return BindingBuilder.bind(demoQueue()).to(demoExchange()).with(DEMO_ROUTEKEY);
    }

    @Bean
    public DirectExchange dlkExchange(){
        return new DirectExchange(DLK_EXCHANGE,true,false);
    }

    @Bean
    public Queue dlkQueue(){
        return new Queue(DLK_QUEUE,true,false,false);
    }

    @Bean
    public Binding dlkBind(){
        return BindingBuilder.bind(dlkQueue()).to(dlkExchange()).with(DLK_ROUTEKEY);
    }


    //延迟插件使用
    //1、声明一个类型为x-delayed-message的交换机
    //2、参数添加一个x-delayed-type值为交换机的类型用于路由key的映射
    @Bean
    public CustomExchange dmpExchange(){
        Map<String, Object> arguments = new HashMap<>(1);
        arguments.put("x-delayed-type", "direct");
        return new CustomExchange(DMP_EXCHANGE,"x-delayed-message",true,false,arguments);
    }

    @Bean
    public Queue dmpQueue(){
        return new Queue(DMP_QUEUE,true,false,false);
    }

    @Bean
    public Binding dmpBind(){
        return BindingBuilder.bind(dmpQueue()).to(dmpExchange()).with(DMP_ROUTEKEY).noargs();
    }


}
新增发送者
package com.xiong.demo.send;


import com.xiong.demo.config.YSRabbitmqConfig;
import lombok.extern.slf4j.Slf4j;
import org.springframework.amqp.AmqpException;
import org.springframework.amqp.core.Message;
import org.springframework.amqp.core.MessagePostProcessor;
import org.springframework.amqp.rabbit.core.RabbitTemplate;
import org.springframework.beans.factory.annotation.Autowired;
import org.springframework.stereotype.Component;

/**
 * @author lank
 * @since 2020/12/14 10:33
 */
@Component
@Slf4j
public class YSMessageSender {

    @Autowired
    private RabbitTemplate rabbitTemplate;

    //使用死信队列发送消息方法封装
    public void send(String message,Integer time){
        String ttl = String.valueOf(time*1000);
        //exchange和routingKey都为业务的就可以,只需要设置消息的过期时间
        rabbitTemplate.convertAndSend(YSRabbitmqConfig.DLK_EXCHANGE, YSRabbitmqConfig.DLK_ROUTEKEY,message, new MessagePostProcessor() {
            @Override
            public Message postProcessMessage(Message message) throws AmqpException {
                //设置消息的过期时间,是以毫秒为单位的
                message.getMessageProperties().setExpiration(ttl);
                return message;
            }
        });
        log.info("使用死信队列消息:{}发送成功,过期时间:{}秒。",message,time);
    }


    //使用延迟插件发送消息方法封装
    public void send2(String message,Integer time){
        rabbitTemplate.convertAndSend(YSRabbitmqConfig.DMP_EXCHANGE, YSRabbitmqConfig.DMP_ROUTEKEY,message, new MessagePostProcessor() {
            @Override
            public Message postProcessMessage(Message message) throws AmqpException {
                //使用延迟插件只需要在消息的header中添加x-delay属性,值为过期时间,单位毫秒
                message.getMessageProperties().setHeader("x-delay",time*1000);
                return message;
            }
        });
        log.info("使用延迟插件发送消息:{}发送成功,过期时间:{}秒。",message,time);
    }
}
新增消费者
package com.xiong.demo.listener;

import com.xiong.demo.config.YSRabbitmqConfig;
import lombok.extern.slf4j.Slf4j;
import org.springframework.amqp.core.Message;
import org.springframework.amqp.rabbit.annotation.RabbitHandler;
import org.springframework.amqp.rabbit.annotation.RabbitListener;
import org.springframework.stereotype.Component;

/**
 * @author lank
 * @since 2020/12/15 15:57
 */

@Component
@Slf4j
public class YSMessageReceiver {

    @RabbitHandler
    @RabbitListener(queues = YSRabbitmqConfig.DEMO_QUEUE)
    public void onMessage(Message message){
        log.info("使用死信队列,收到消息:{}",new String(message.getBody()));
    }

    @RabbitHandler
    @RabbitListener(queues = YSRabbitmqConfig.DMP_QUEUE)
    public void onMessage2(Message message){
        log.info("使用延迟插件,收到消息:{}",new String(message.getBody()));
    }
}
新增测试入口
package com.xiong.demo.controller;

import com.xiong.demo.send.YSMessageSender;
import org.springframework.beans.factory.annotation.Autowired;
import org.springframework.web.bind.annotation.GetMapping;
import org.springframework.web.bind.annotation.RequestParam;
import org.springframework.web.bind.annotation.RestController;

/**
 * @author lank
 * @since 2020/12/14 17:05
 */
@RestController
public class YSMessageController {

    @Autowired
    public YSMessageSender messageSender;

    //死信队列controller
    @GetMapping("/send")
    public String send(@RequestParam String msg,Integer time){
        messageSender.send(msg,time);
        return "ok";
    }

    //延迟插件controller
    @GetMapping("/send2")
    public String sendByPlugin(@RequestParam String msg,Integer time){
        messageSender.send2(msg,time);
        return "ok";
    }

}
测试
GET http://localhost:8080/send2?msg=方法1&time=5
GET http://localhost:8080/send?msg=方法3&time=5